As always, before I begin my description, I'd like to give credit to the original creators of this project. It's called Ka-Radio and there's an instructable here, Hackaday here, and GitHub here. The Instructable/Hackaday try their best to explain how to make the radio, but I suspect they're written by engineers who aren't too comfortable in English. Details are very sparse - especially when it comes to flashing the ESP. It's a great project though, and all credit goes to those who created it.
Many of the posts on Ka-Radio's Facebook page are in Russian - often by people who have already made the device and want to show off the fancy case they've constructed.
Unfortunately, for a comprehensive explanation for people who aren't engineers, GitHub isn't any better. The information is there but you need to jump from one place to another to understand which files to use, how to use them, and what's the latest version.
So, the purpose of this blog is to explain how to make the device in one, concise, and easily comprehendible description.
I'm using a Mac
I'm using a Mac to work on the project. Some of what I write may be applicable to Windows, but I suspect you'll need different programs to get things running.
Components
You'll need: (my links are to Aliexpress, but you can buy them anywhere)
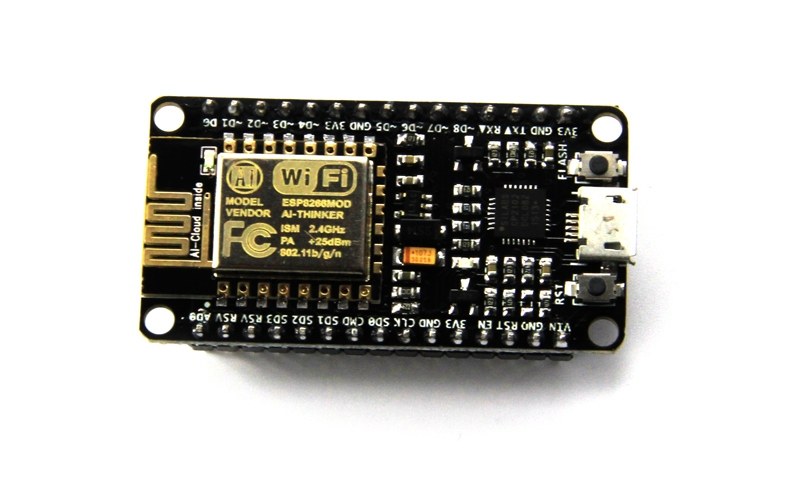
- ESP8266 - preferably a development board with built-in programming circuitry and a micro-USB socket. I've been working with the NodeMCU but it will also work with the Wemos D1 mini.
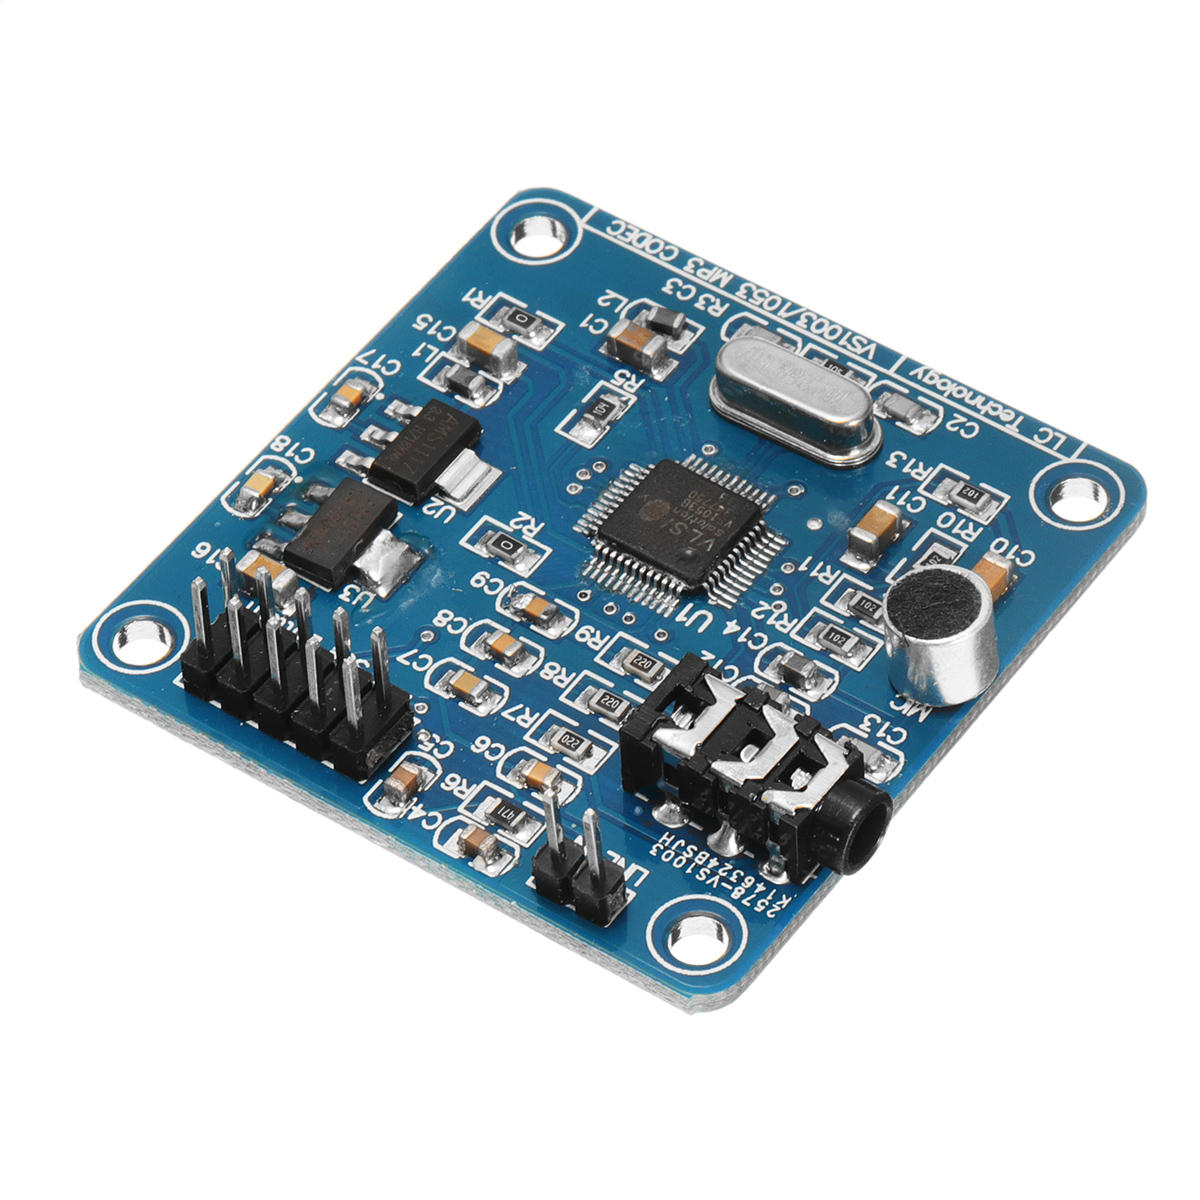
- A VS1053 decoder board. This board doesn't have an amplifier. Personally I only wanted earpiece output, so I didn't need any more components. If you want to hear it through speakers, you'll need to add an amplifier.
Getting the Program on the ESP
Here's where things are complicated. I've flashed hundreds of ESPs - but always using the Arduino IDE. The problem is, from what I can see, the programmers only provide binary files and they are much more complicated to flash to an ESP8266 using the Arduino IDE. I struggled with it for a while and gave up. I was unfamiliar with anything other than the Arduino IDE but if I wanted this project, I'd need to find an alternative way to flash. This became confusing because so many internet sources give so many different formulas and by the end of the day, I had no idea which process was correct.
Eventually, I came across this video on YouTube that gave me the direction I needed.
- The first thing I needed to do was make sure I have pySerial installed on my Mac. This would enable python (already on my computer) to communicate through the serial port. Instructions for doing this can be found at Adafruit, here.
- The second thing you need to have in your Mac is esptool-master that can be acquired here. Before you try to follow the installation instructions, read the next bullet-point.
- The previous step assumes you already have pip installed on your computer. I didn't, so I had to install that too. Instructions are here.
So, now I had all the elements necessary to flash the ESP. (All of this, by the way, is omitted from the Instructables/Git mentioned in my introduction - which is why they're so difficult to dechipher.)
Let's Flash
Take a look at the GitHub page. Hidden in the middle of the text it says:
To load this release, please flash boot_v1.6.bin at 0x0000,
user1.4096.new.4.bin at 0x1000 ,
user2.4096.new.4.bin at 0X81000,
esp_init_data_default.bin at 0x3FC000
and blank.bin at 0x3fe000
This is a few lines of text, but without clear directions, it's very easy to just skim over as you're reading. I did, several times - until I finally realized that this complicated-looking data is the core instruction of the entire project!
Yes, GitHub does have the current binary files - but they're hidden away under ESP8266_Firmware/bin. Even when you go there, it's not clear which files to use. Which are current, which aren't...
So, to make it simpler, I suggest you jump over to the Hackaday page and scroll down to the file section. Then, download the files and place them somewhere on your computer that you can find them. (In my case I placed them in the esptool directory that I created when I downloaded esptool-master above. This is to make it easier to write a command without long paths to the files.)
Once you have the files, you need to flash them. Before we do anything further you need to understand that you'll be flashing five separate files into the ESP. Each file will be flashed to its correct address. The file names and their respective addresses are detailed in the quote above.
At my first attempt, I flashed only one file and couldn't understand why the project wasn't working. It took several re-reads to understand I needed all the files. Also, it may not be five files. In the diagrams that appear on the Instructables page, they actually flash the blank.bin file to two locations. I don't know if this is necessary, but I did it anyway, and things work fine.
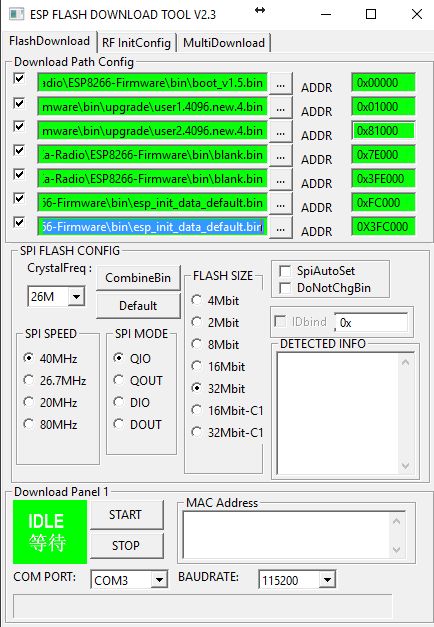
(Note, using esptool on Mac Terminal doesn't give the interface above - all you get are lines of text).
Working in Mac Terminal
To do the flashing you'll need to enter your Mac's Terminal. (For those used to the Raspberry Pi this is a cinch!)
- Change directory into the place you have your files. For example:
cd /Documents/esptool
- Before you type your commands, you need to make sure you can see the serial port. To do this, while your ESP is attached to USB, you need to type this command:
ls /dev/tty.*
This should give a result that looks something like this:
/dev/tty.Bluetooth-Incoming-Port /dev/tty.wchusbserial14640
Note the USB serial port name - in my case, wchusbserial14640
The Flash Commands
Now you need to flash the binary files one at a time. I suggest taking them in the order they appear above. (It probably doesn't make any difference because they're going to a specific address, but why take the chance?)
The first time I tried to flash, I used this command:
sudo ./esptool.py -port /dev/tty.wchusbserial14640 write_flash 0x0000 boot_v1.7.bin
Naturally, as with all things technical, it didn't work. The computer wouldn't recognize the USB port. I scratched my head until I read the esptool instructions.
If no -p option or ESPTOOL_PORT value is specified, esptool.py will enumerate all connected serial ports and try each one until it finds an Espressif device connected (new behaviour in v2.4.0).
From my understanding, this would mean I could remove the USB port and have the computer find it itself. So, I tried this:
sudo ./esptool.py write_flash 0x0000 boot_v1.7.bin
Miraculously, it worked!
I then went through all the files and flashed them to the appropriate location. Again, as I said above, you may need to flash the blank.bin file twice.
Connecting the Hardware
As it happens, I used exactly the same NodeMCU board that appears in the Instructables. If you're following the wiring diagram on the Instructable, I'd point out that the picture doesn't correspond to the list of connections at the side. XCS needs to be connected to D8 - which doesn't appear on the picture. Other than that, all you need to do is make sure you connect ADC0 to GND, and you're ready to go.
Finding the Interface
It took me a couple of tries before I got things working. Despite the flash going through without errors, I couldn't find the interface on my browser. My NodeMCU had been flashed dozens of times. I decided to wipe it clean, then try a fresh flash.
esptool.py erase_flash
Next time I flashed all the binaries back into the ESP, everything worked.
How it connects to your home network
When you first set up, your ESP goes into AP mode, broadcasting its own network. Disconnect your computer from your home network, and connect to the ESP's network WifiWebRadio. Once you're connected, type 192.168.4.1 into your browser address bar. If everything's working, you should get this page:
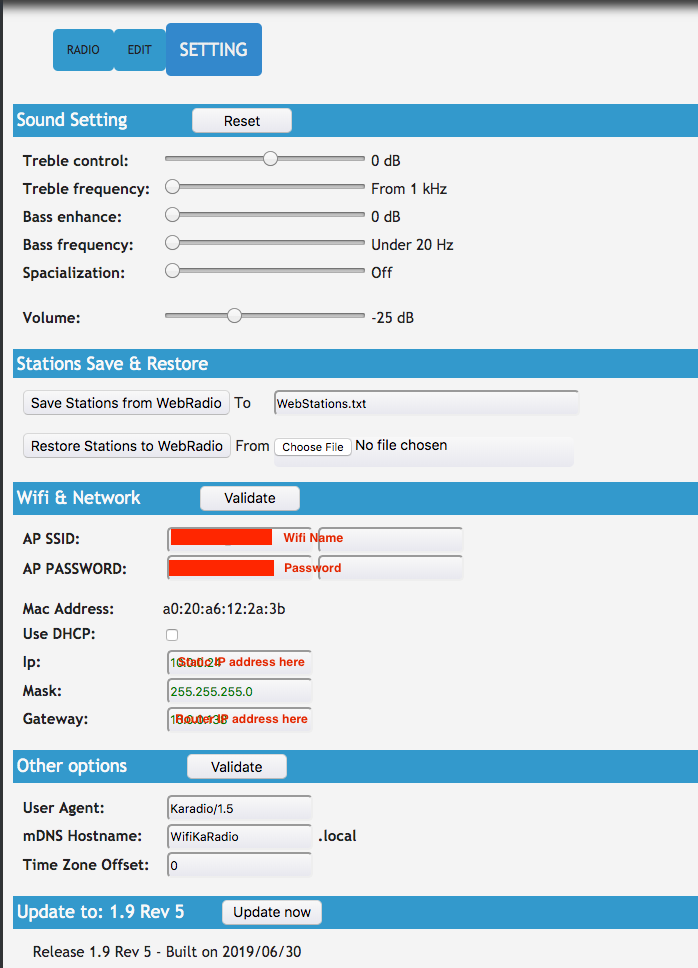
Now you need to program the ESP to connect to your home network. Complete the details of your SSID and password as illustrated above. I strongly recommend giving the ESP a static IP address while you're at it (unclick DHCP and write in a specific address). This way, you always know how to find it on your home network.
Click Validate and your ESP will reboot, this time connecting to your home network, at the IP address you specified. Now reconnect your computer to your home network, and go to the specified IP.
Getting Sound
I plugged an earpiece into the VS1053, then typed in details of a BBC stream. I then spent several hours troubleshooting because I didn't hear a thing. I can't count how many times I flashed and re-wired. I was getting very, very frustrated.
I was about to give up when I came across this list at the bottom of the setting page:
I clicked one of the links and found several radio stations. I manually placed a random station in the Edit table. The radio instantly started to play! It turns out, after hours of frustration, that the URLs I'd put in for the BBC didn't work with this application. (They do work on the Interner Radio I built with a Raspberry Pi).
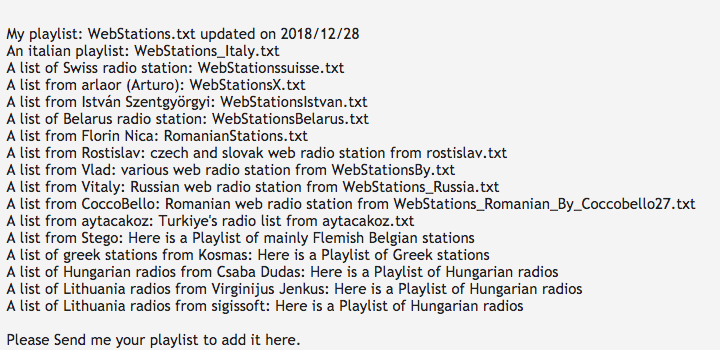
Adding Dozens of Stations
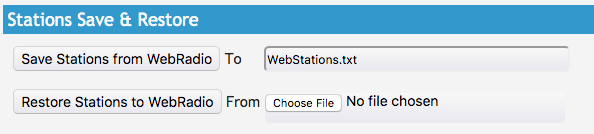
My next surprise is when I came across this list on the GitHub page. I downloaded it and converted it to a .txt file. Then, using the Restore Station to WebRadio button on the Settings page, I uploaded the file. Instantly, I had dozens of stations to choose from. (Here, I'll admit my disappointment: the stations are almost all blaring inane pop music from the 1970's. The BBC links in the list don't work either.)
Phone app
The next big surprise is when I found the Ka-Phone App for my Android phone. Stick it in the phone, give it your radio IP address, and off you go.
Next step is to 3D print a case. Watch this space!