I haven't written a post on this blog for a few months now. Usually, if I don't have time to work on a new project I at least try to write about some past projects, from my pre-blogging era. This time my schedule was so tight I couldn't even find time to write. Why? Well, Because I was getting ready for a big event - My Wedding!! Yes, I've been living with my girlfriend for the last 3 years and the time has come to take it to the next level. The Wedding event was a really big project, if I would write here about the entire process it will take more posts than everything I've written so far. Instead, I would like to focus on one of the mini-projects I made, which is also related to the blog's spirit in some way.
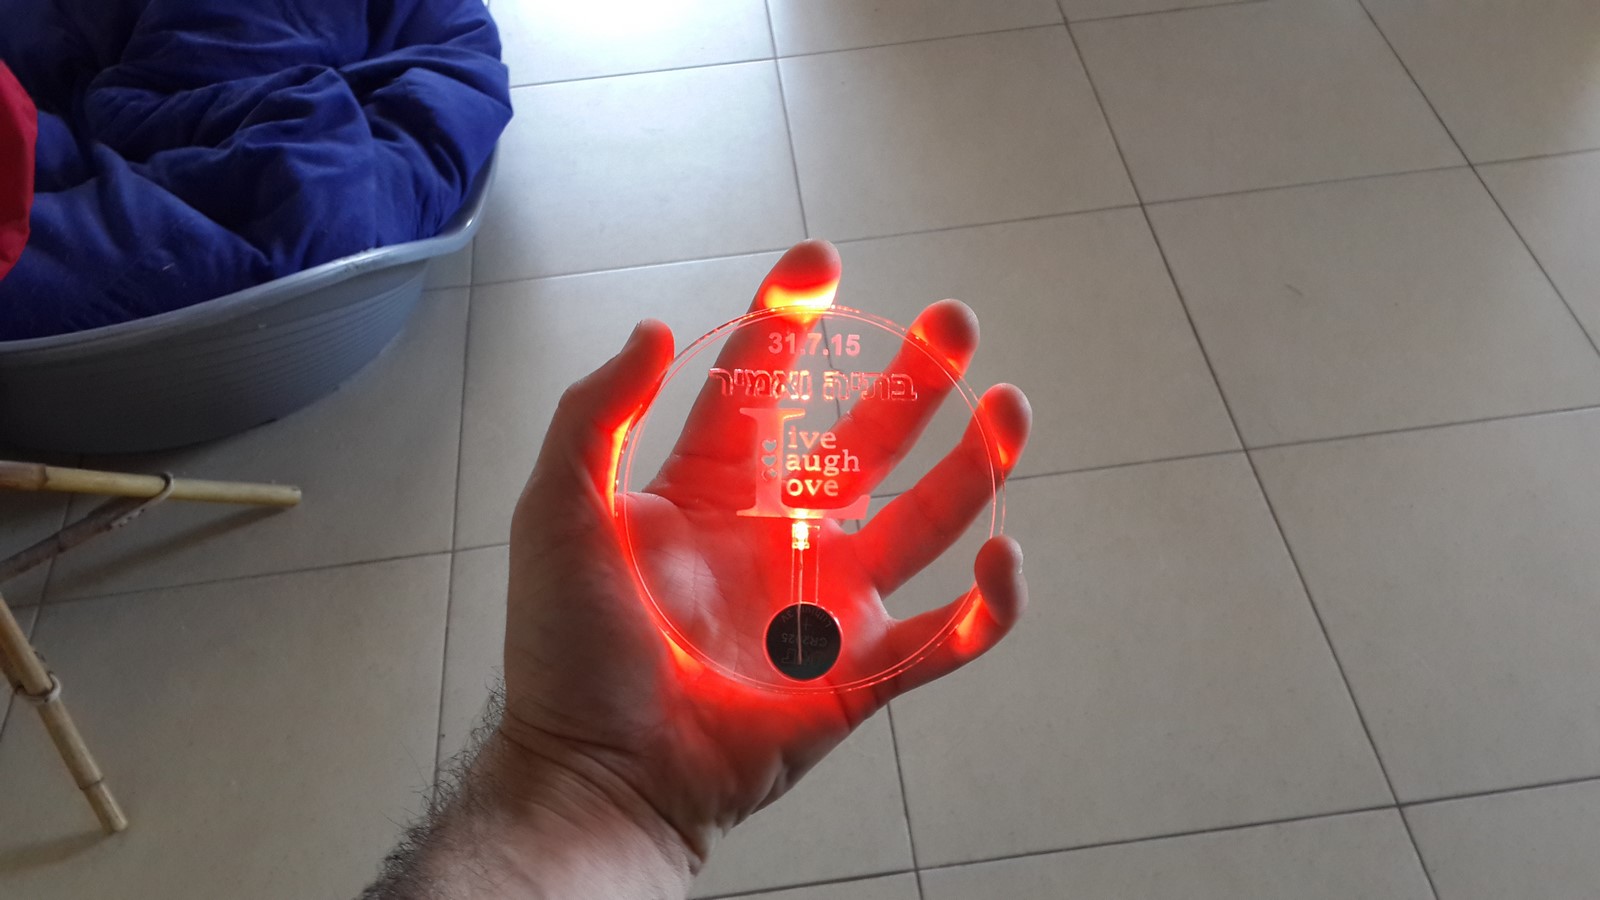
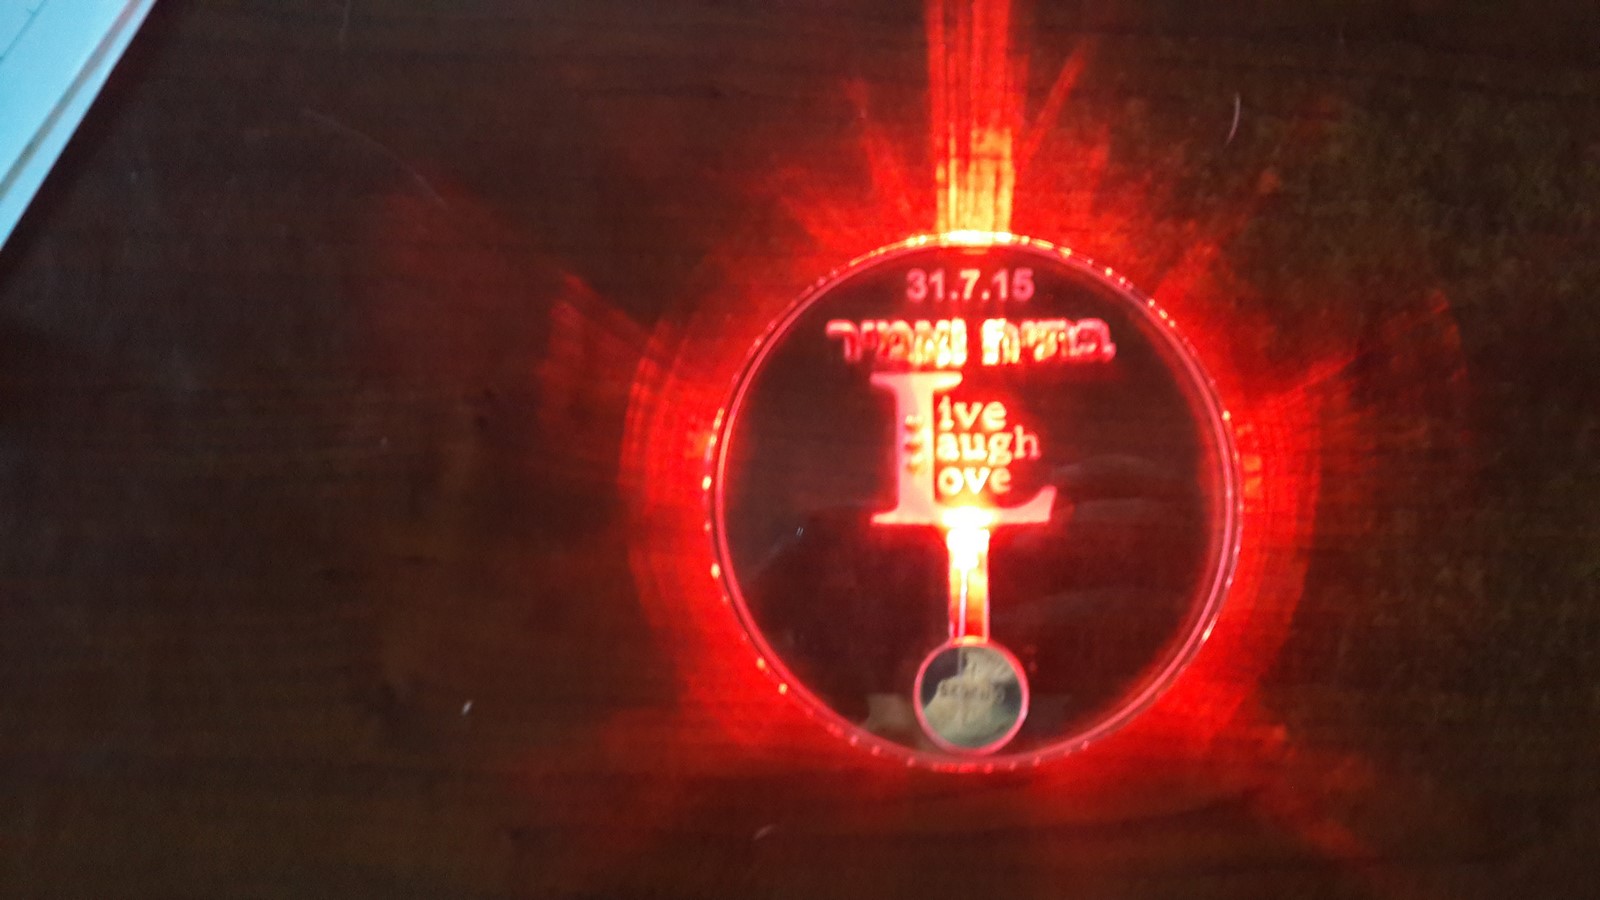
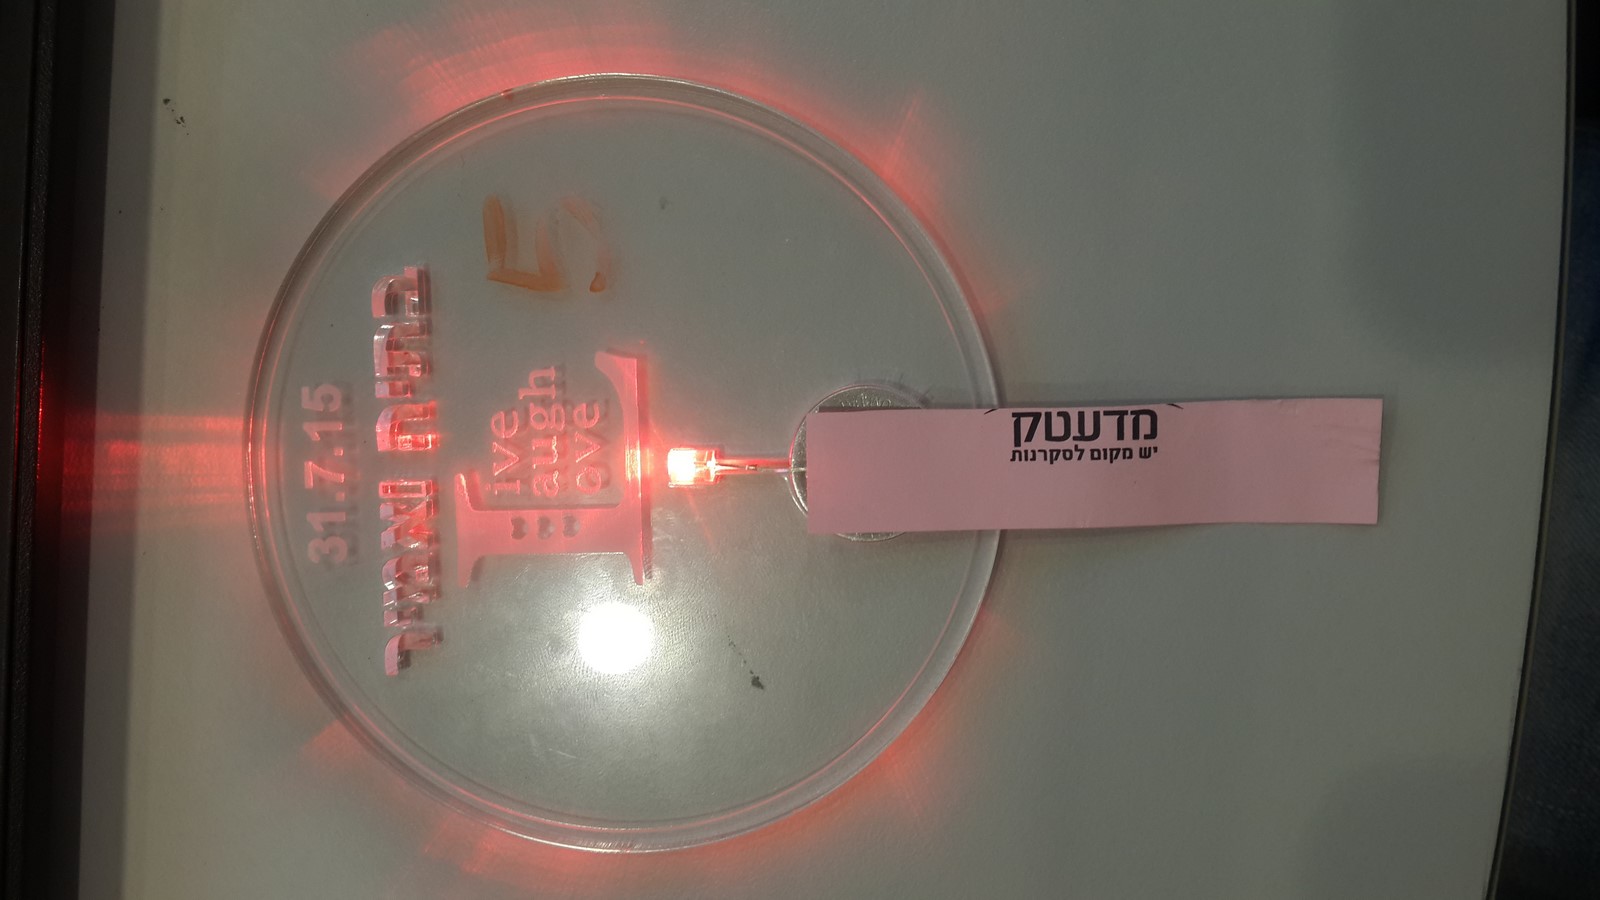
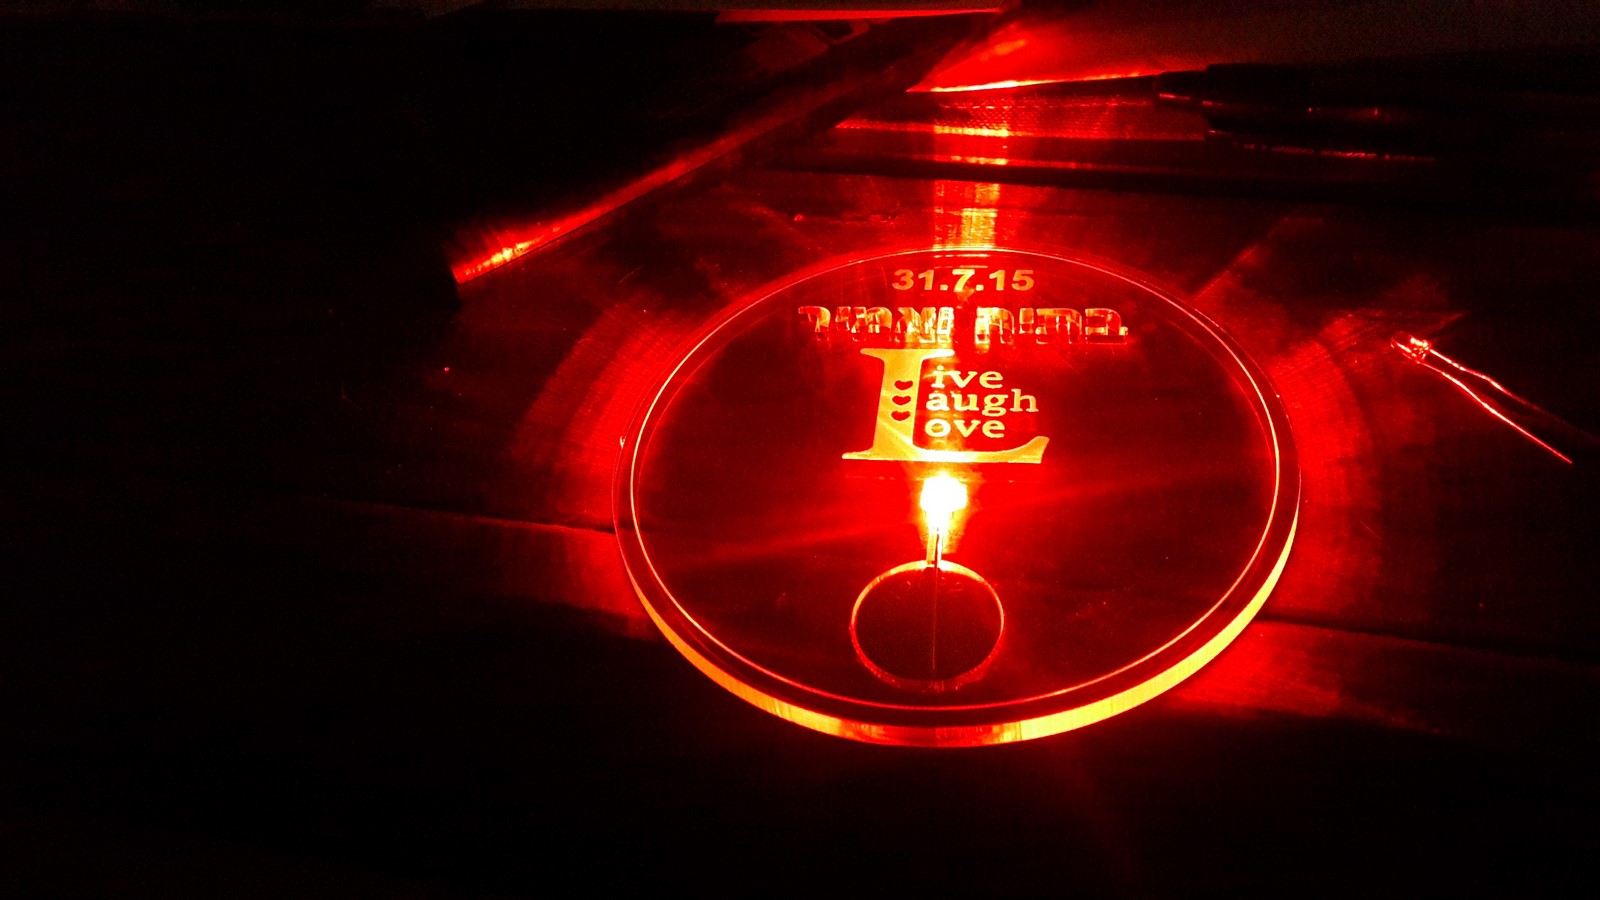
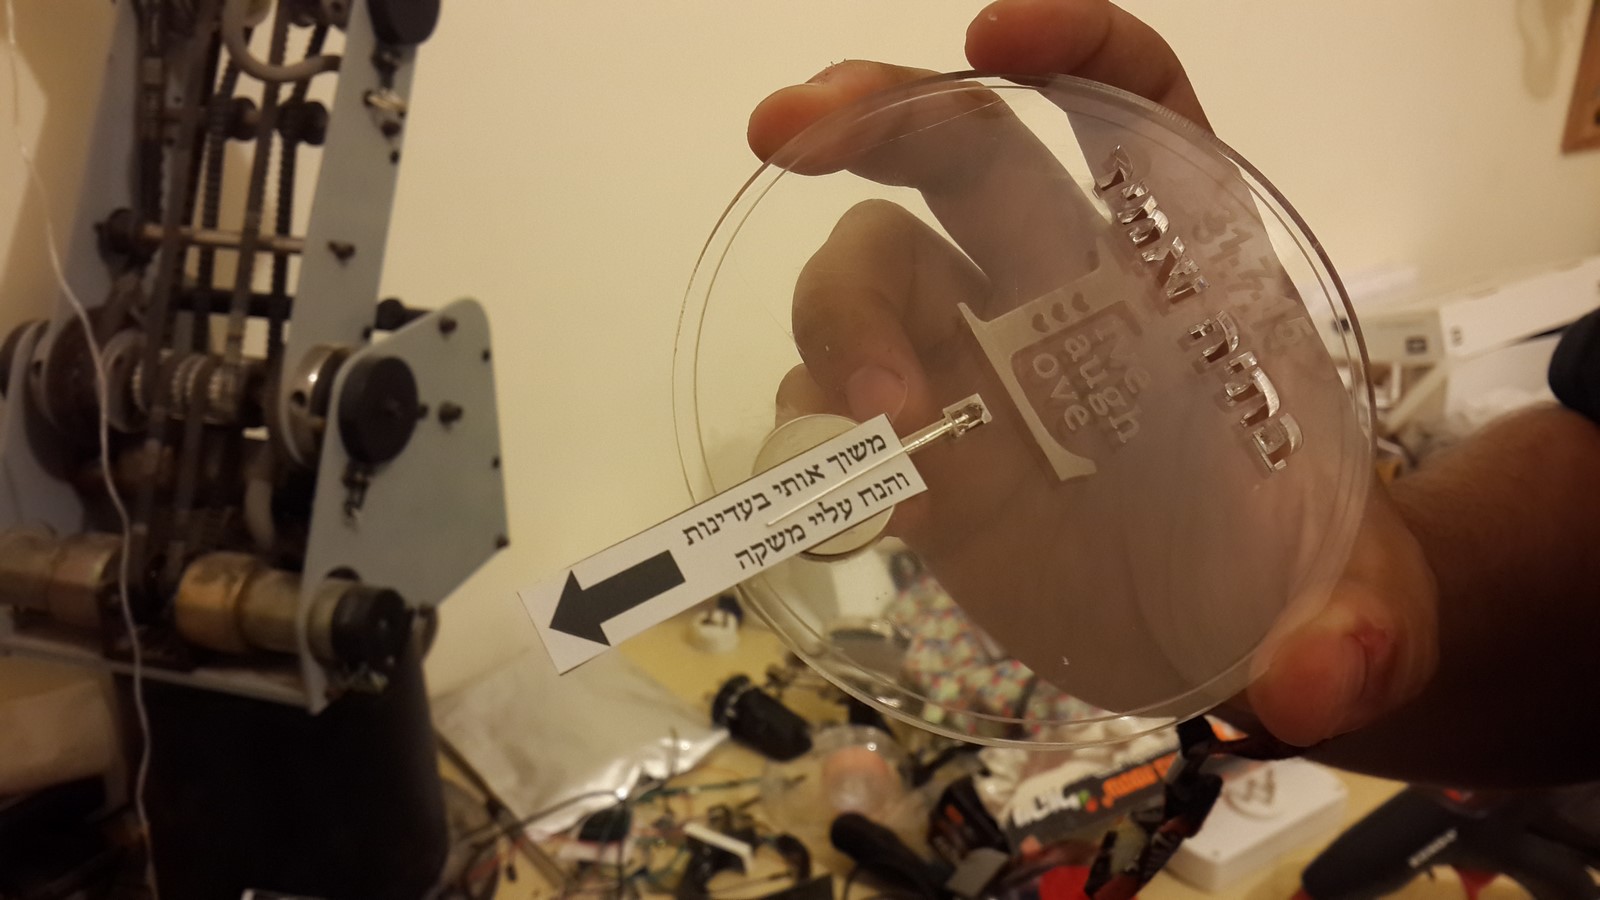
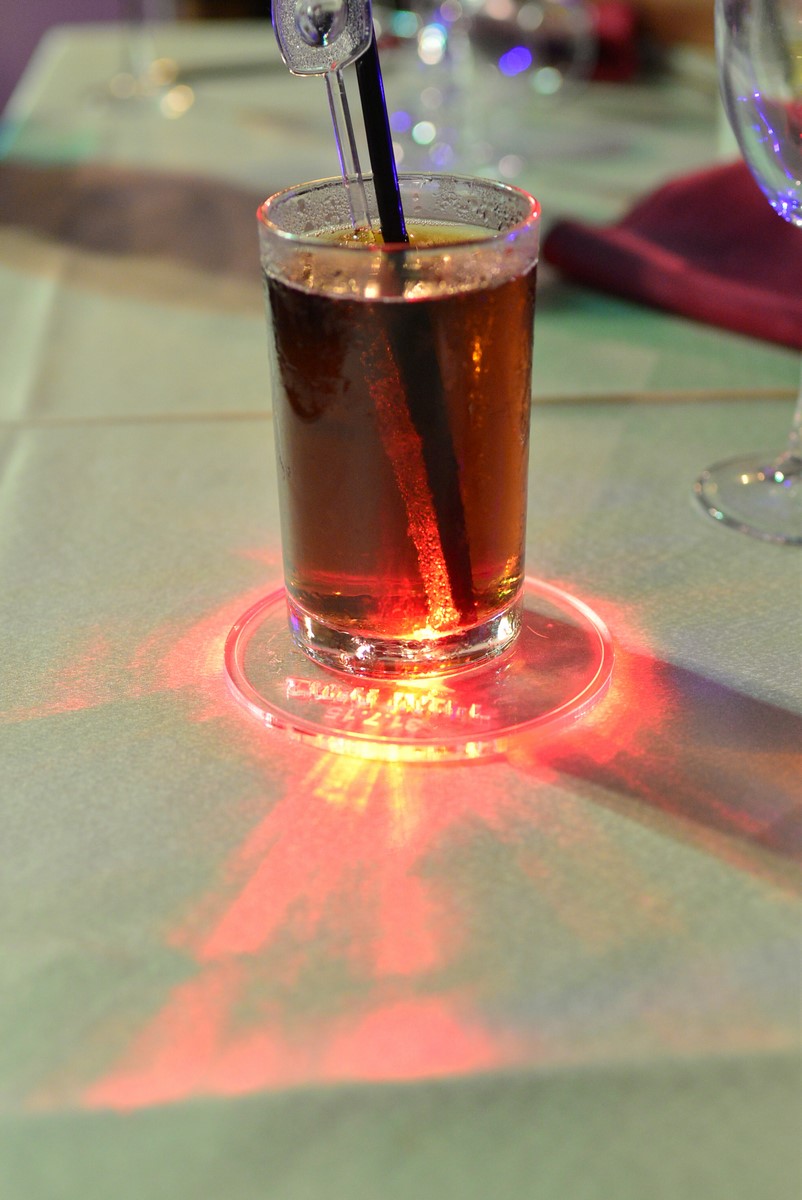
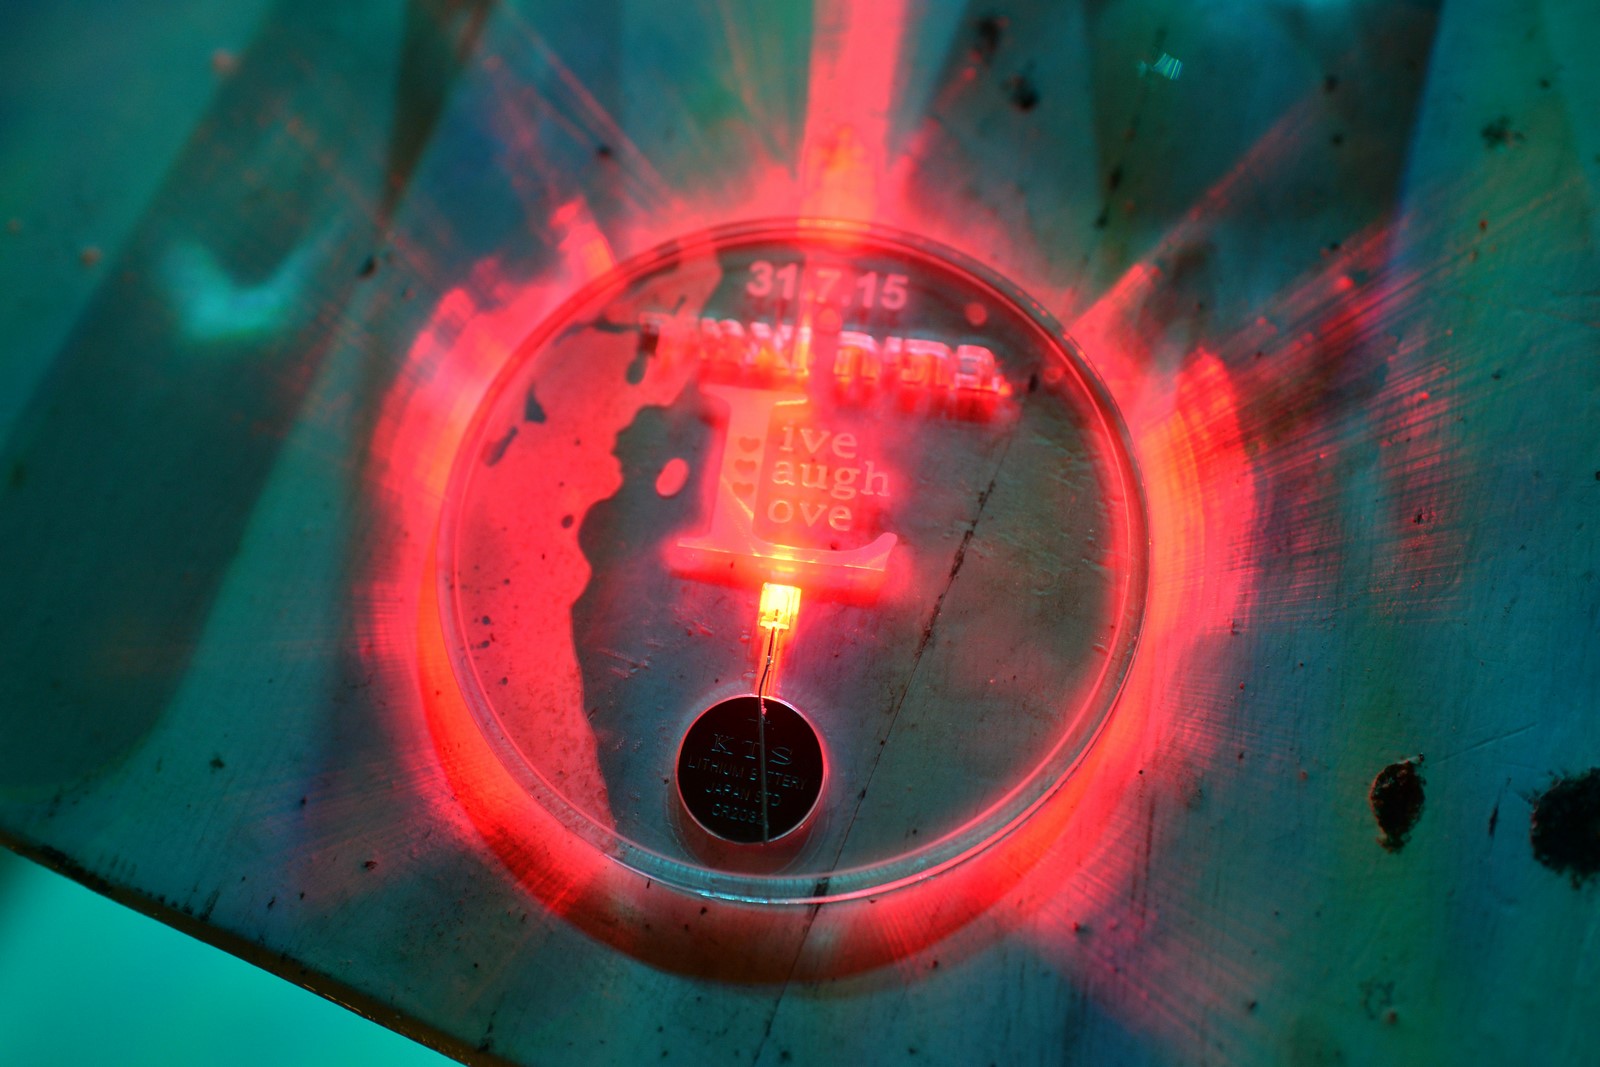
During a wedding in my country, it is common to give the guests small gifts/favors. Some give decorated boxes of chocolate, some give small plants. Me and my then-fiance-now-wife were sitting next to my computer on a sunny weekend, browsing websites, trying to think what we can give as gifts. We had a lot of time to choose, it was about 6 weeks before the event. Then it struck me: "Hey why don't we make something of our own?. Let's go to the the Fablab downtown, have some brainstorming and think of an original gift". Since I have the entire post to write about this story and the process I will cut to the chase - We made perspex (Acrylite , Plexiglas... It has many names) coasters. On the coasters we laser-cut our names, and laser-engraved the Wedding date and a nice icon we chose. The twist was cutting a place for a CR2032 battery and a 3mm led, which when turned on, lights the entire coaster, and makes the cut and engraved parts glow. A movie is worth a thousand words (times the frames) so take a look:
Also, here's a "teaser" of how a mass production of these coasters looks like (you'll be able to read more about it later in this post):
The wedding took place on July 31st, which also happened to be the "Jewish Valentine's Day". We started planning the gift roughly one and a half months before. Given the fact we didn't even know what we needed for the product and the long wait when making an online order, we didn't have so much time.
I will divide this post to two parts. In the first part I will describe the entire process, with many photos, videos and descriptions. In the second part I will give some tips on how to save time and money if you make this kind of project. Enjoy!
The Process
1. The idea being developed
(June 20th, ~6 weeks to deadline) - Following the first paragraph, we arrived to the near Fablab and consulted with my buddies over there about an original idea. Several ideas came up, all involving the laser cutter. The first idea was to curve a wooden piece which will have the name and table number of each guest. We gave up this idea pretty quickly since we wanted something which will be relatively easy to make (We had SO much more to organize other than that). Then, we thought about a wooden circle, with our names curved on it, and with magnets on the back so people can take it as a souvenir and use it as a fridge-magnet. At a certain point I really wanted to add leds to the gift (Did you read the rest of the blog? I really like leds :) ). This idea brought us to think about a wooden circle, with our names curved in it, with a place in the middle to put a battery and a led, and on it, put a sticker with the guest's name. OK, that sounded like something which can turn out nice and not too hard to make, also not too expensive. We scheduled a meeting with the Fablab instructors to make some tests (I can't operate the laser cutter on my own.. yet!), and before coming there, we made our first draft of the product.
 The draft is a 10x10cm image consists of:
- A circle which was planned to be cut.
- An inner circle which was planned to be curved.
- Our names at the top - Were planned to be cut by the laser.
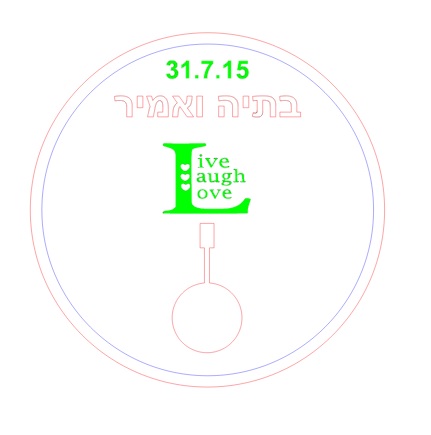
- A logo we really liked - Was planned to be curved by the laser.
- The Wedding date at the bottom - was planned to be curved by the laser.
- A square which was planned to be cut and filled with the led, battery and the sticker on it.
In order to make sure we will not face any problems, the first thing I did was to measure the leds I have at home (5mm) and some CR2032 batteries (2mm). It seems that a 5mm wooden piece will be enough for this project.
2. First tests meeting
(June 24th, ~5 weeks to deadline) - A few days later we got to the Haifa Fablab, and met there with Yulia, one of the lab's instructors and a very creative designer. We found ourselves talking a lot about the product instead of making tests. I insisted I want leds inside this gift, that's because I had the idea that adding the leds will make a more original product that people have yet to see in weddings. Then she asked us what about using perspex instead of wood. We didn't consider that until that moment, but she said that from her experience, combining leds and perspex produces some nice results. Also, the Fablab didn't have the exact type of wood we wanted, so we decided to go with the perspex. First, we imported the draft picture into Inkscape, a freeware that can output a .DXF vector file which suits the laser cutter. Before saving the file we had to modify part of the image so it would suit a vector file. Also, Yulia suggested we change the big box, where the battery and leds are supposed to be, into a battery shaped contour so the battery would fit in nicely. Everything was done, and we went to make some tests - These are how the first tests came out:
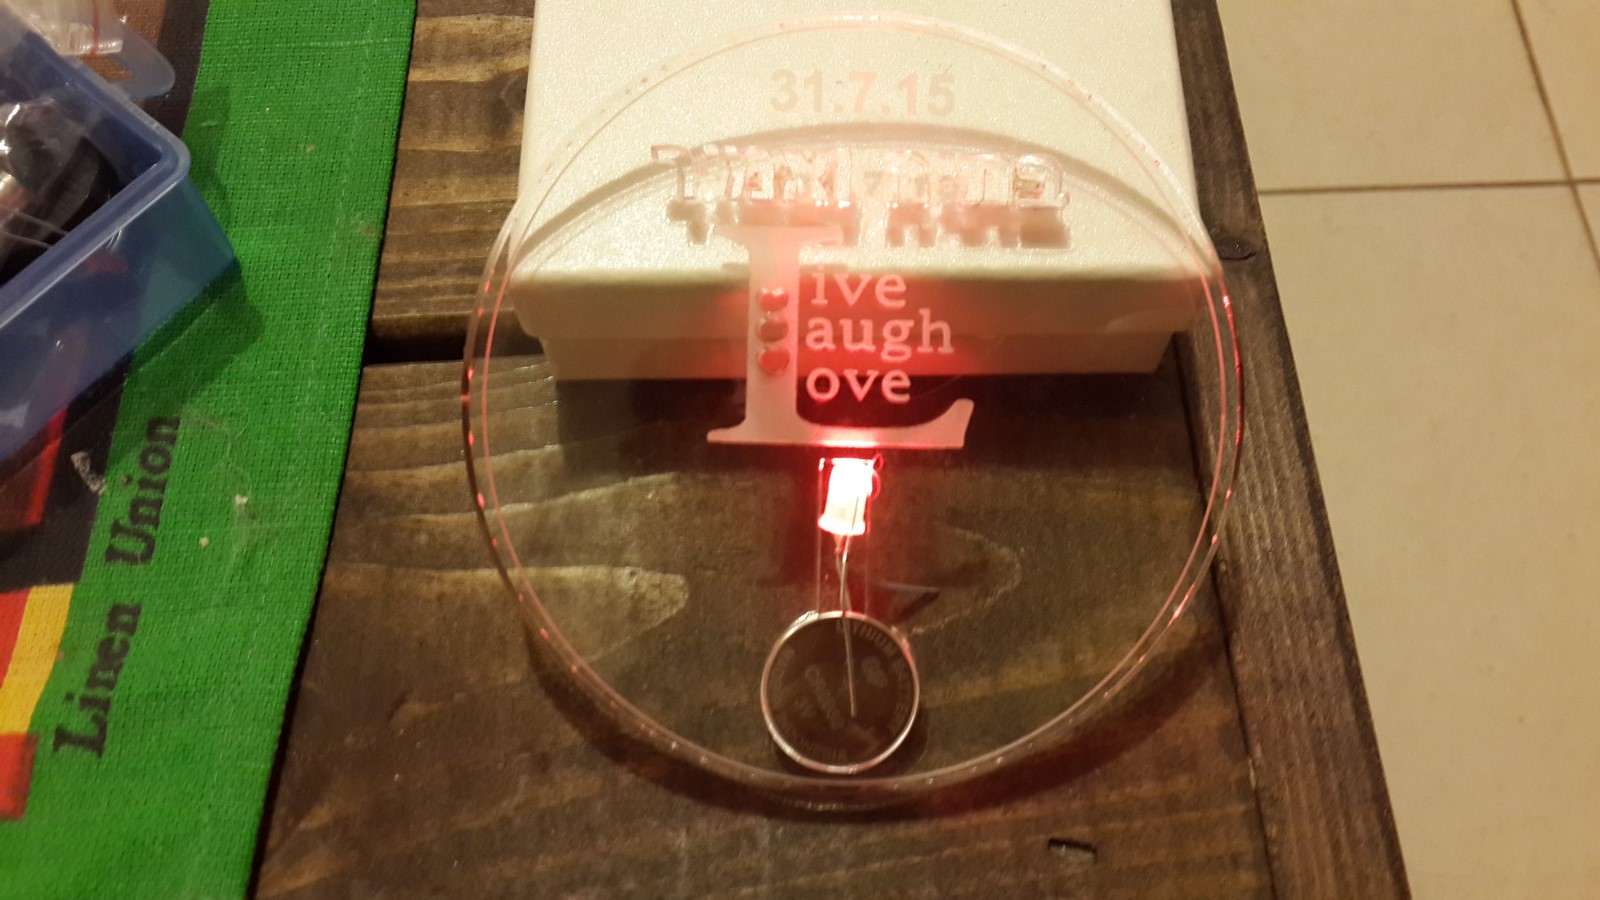
After the meeting we were really excited! It looked really nice just as is, no more needed. That was the moment we decided to present it as a coaster, a glowing coaster, no stickers with name tags needed. Still, we faced many new problems we didn't plan:
- 5mm leds were a good option, less than that will not produce enough light. I had in big quantities some 3mm leds which were not powerful enough, and 10mm leds which were definitely not an option, way too big.
- Using perspex 6mm thick was much more expensive than we planned. Also it didn't look so good, too thick than I expected.
- I only had CR1616 batteries in big quantities, taken from this post. It seemed this battery wasn't able to supply enough current to the led to make it look nice.
3. Problems solving
(June 25th - July 12th, 3-4 weeks to deadline)
The solution to the first problem actually also solved the second one. While reading a bit more about leds I've learned that the 3mm leds I had in my house are actually "indicator leds", which need only a few mA to operate, and that's why they are not so powerful. Turned out there's a second kind of leds, "Super-bright leds", which is the same as the 10mm leds I had, and give a lot of light, even at 3mm size.
What I realized at that point is that I can easily get 3mm leds which have very good brightness. In Tayda electronics for example, you can find 4000-6000 MCD 3mm leds for 0.02 USD a piece.
As I mentioned before, our postal service pretty sucks so I couldn't take the chance ordering from Tayda (Sometimes it takes up to 6 weeks to get a package). I started looking for electronics stores around my area. All of them sold the leds in ridiculously high prices (0.5 USD per piece). Finally I found one store where, in large quantities and after a discount, sold it for 0.1 USD per piece - not so cheap as in Tayda but affordable. Finally, I bought only red and orange leds since green and blue needed almost or more than 3V to be operated (3V - The CR2302 voltage) so they lit very low or not at all.
The second problem was already solved by now. After getting the 3mm leds, I measured them, and found the leds base is about 3.8mm, which means a 4mm thick perspex will be enough for the led to go inside it. 4mm was much cheaper and nicer as well. I looked for a perspex workshop in my town and found "Melina", a great workshop which, I was surprised to find out, is owned by my workshop teacher from the 7th grade, the same teacher who taught me what "perspex" is.
Anyways, after some chats with the owners I learned a lot about perspex. The type I eventually used is called "Cast perspex", and it has a thick tolerance of 20%, which means that a 4mm plate can be 4.8mm thick at some parts, where some other parts can be 3.2mm thick. Nevertheless, I decided to go with the 4mm plate, at least for my tests, since according to the owners, the error usually goes up and not down (meaning a thicker plate).
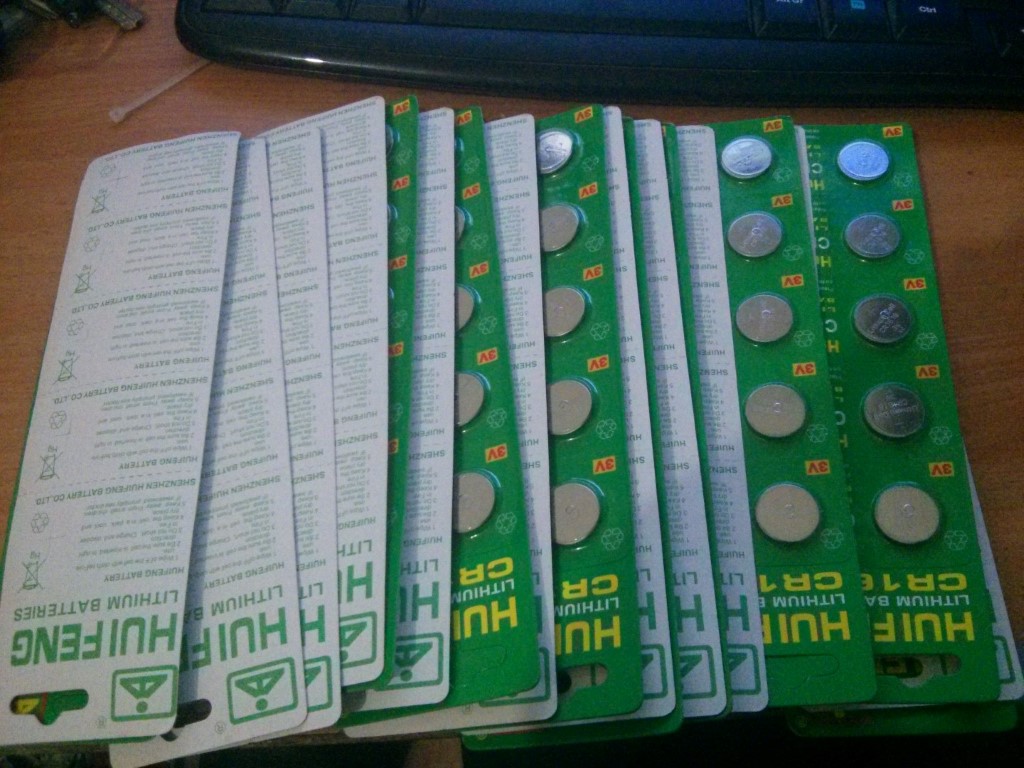
The third problem was the hardest one to solve. Looking around the web I found CR2032 batteries in less then 0.2 USD a piece, but as I mentioned before, I couldn't take the chance of making an online order when the deadline was so close. So, same as with the leds, I was looking for an affordable option around my town. Unfortunately, I didn't find ANY affordable solution. The cheapest price for these batteries was 2USD a piece, which was more or less the price I was expecting the entire product to cost. Then, while telling it to some friends at work, one of them mentioned he is going to the US the next week, to a conference, and if I find the batteries in an american website I can order it to his hotel. That was a perfect idea! I immediately found it on this link on Amazon and made an order - 200 batteries for 30 USD, 5-7 days shipment.
On July 12th, the batteries were in my hands! Thank you Roni!
4. Second tests meeting
(July 8th, ~3 weeks to deadline) - Once again, We went to the Fablab, this time knowing exactly what we wanted. Before arriving there I made a few modifications in the Inkscape file, which by now looked like that:
Notice the places for the battery and for the led now exactly fit the battery and led sizes. The different parts were colored in order to instruct the laser cutter which parts to cut, vector curve or fill&curve.
This time the difference between all our tests were much more subtle, mostly changing some parameters in the laser cutter operation such as resolution, power, speed etc. We finished with 5-6 different test cases:
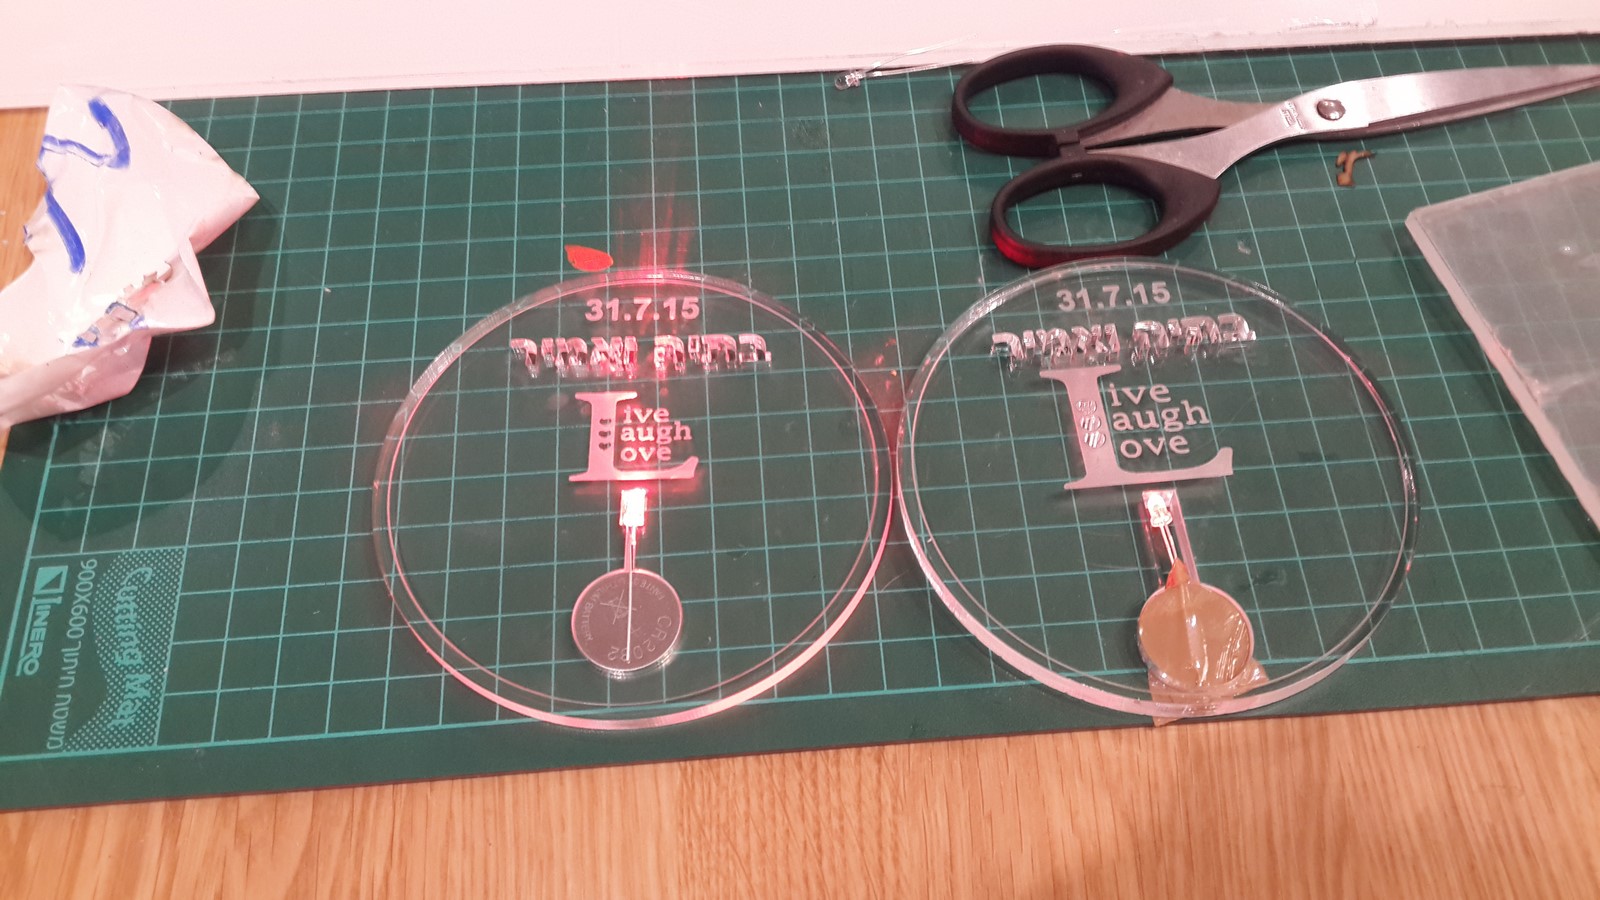
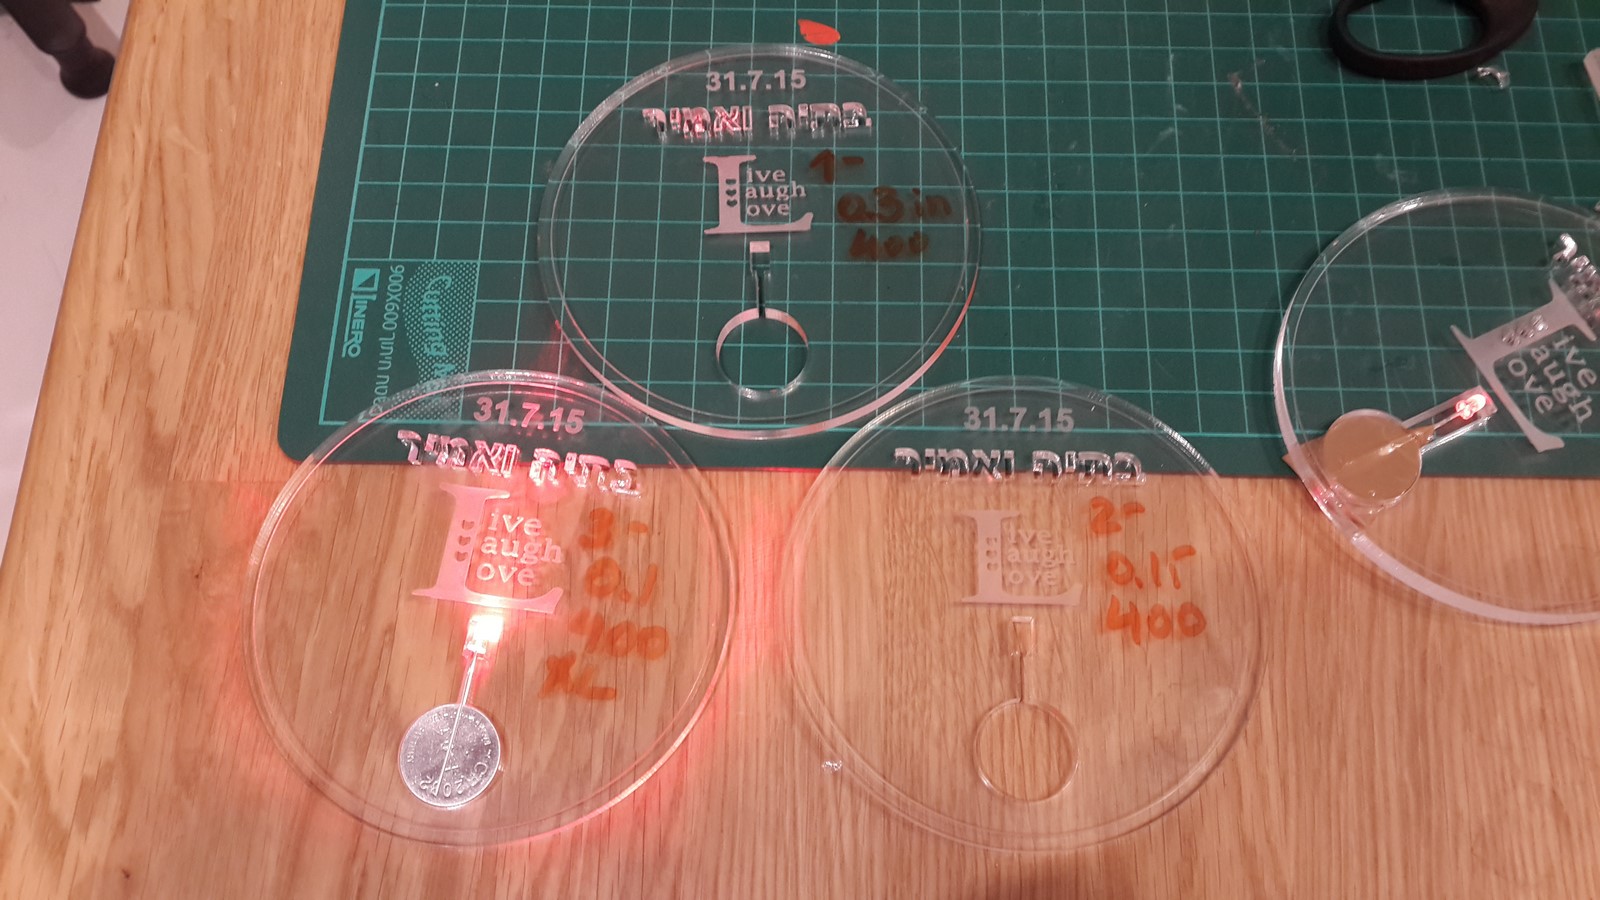
And decided on the one we loved the most:
5. Going mass product
(July 9th - July 24th , 3~1 weeks to deadline)
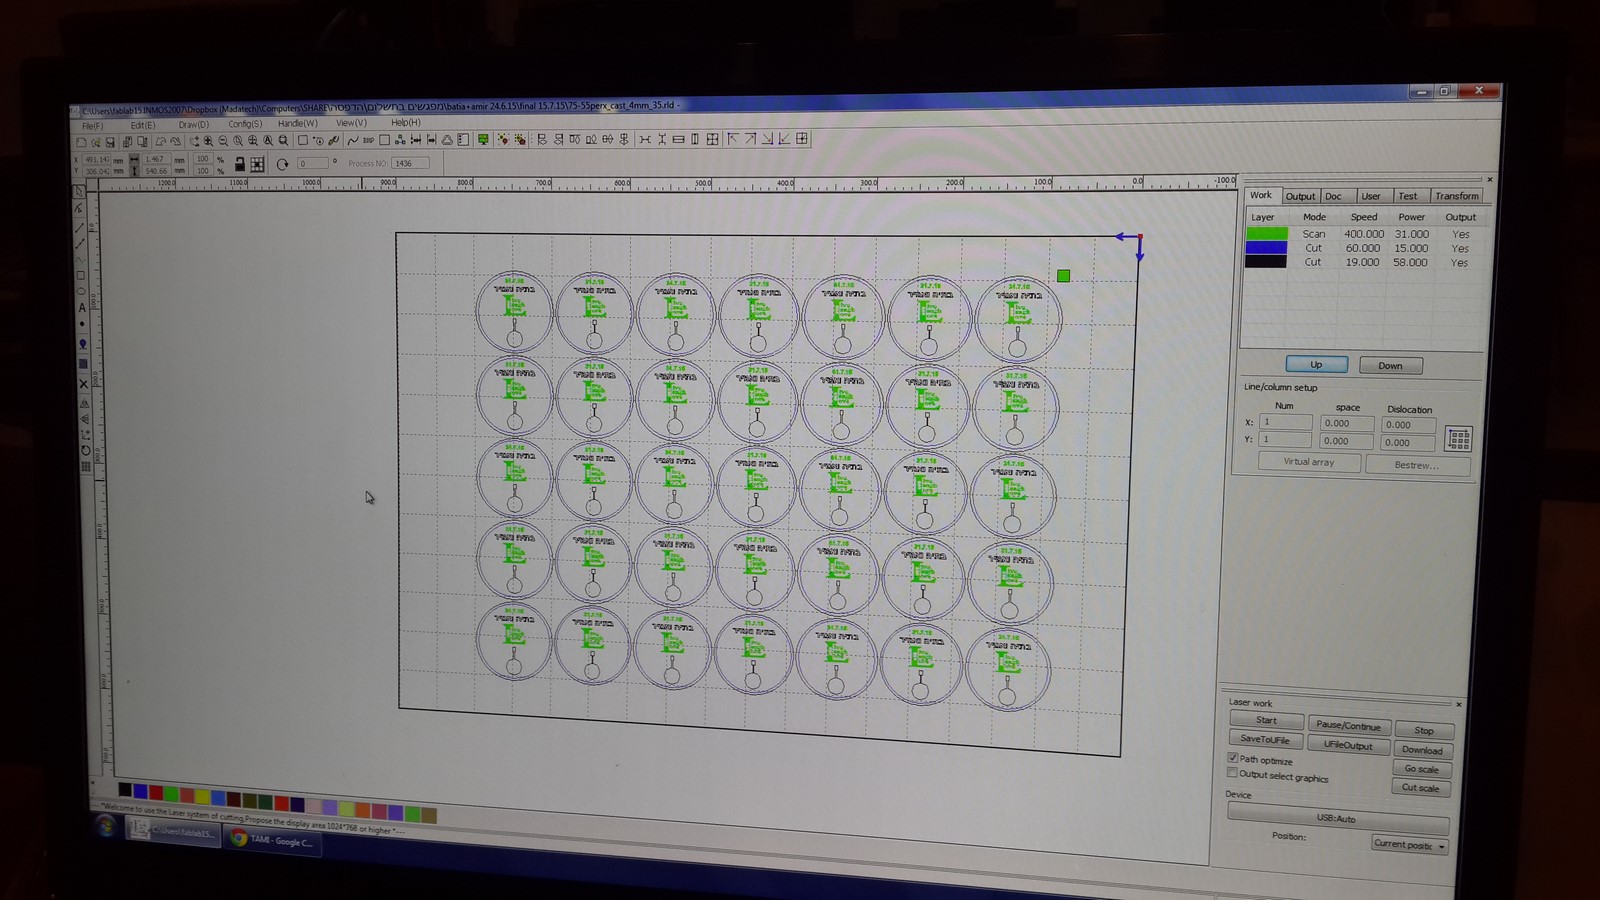
From here, the expensive, difficult and most fun part started. I went back to "Melina" (The perspex workshop) and ordered four perspex plates of 55x75cm, 4mm thick. This was almost the maximum size that fit the laser cutter. It took a few days and on July 14th I got them. During this week I created a mass production DXF file to use on the plates. It was mostly copy-paste procedure with respect to the the gaps between the coasters. Here is how it looks on the laser cutter program:
A short pause: On July 16th my friends surprised me and took me to a bachelors party in Berlin for the entire weekend so there was no progress with this project (It was worth it though ;) ).
On the following week, the mass production began. Yulia helped me a lot and did most of the process while I wasn't there, since it took a few hours of operating the machine. Here are two movies I shot during the process.
Curving:
Cutting (I've added some music!):
I still haven't figured out the optimization process of the machine and how it determines it's paths. If anyone knows please enlighten me.
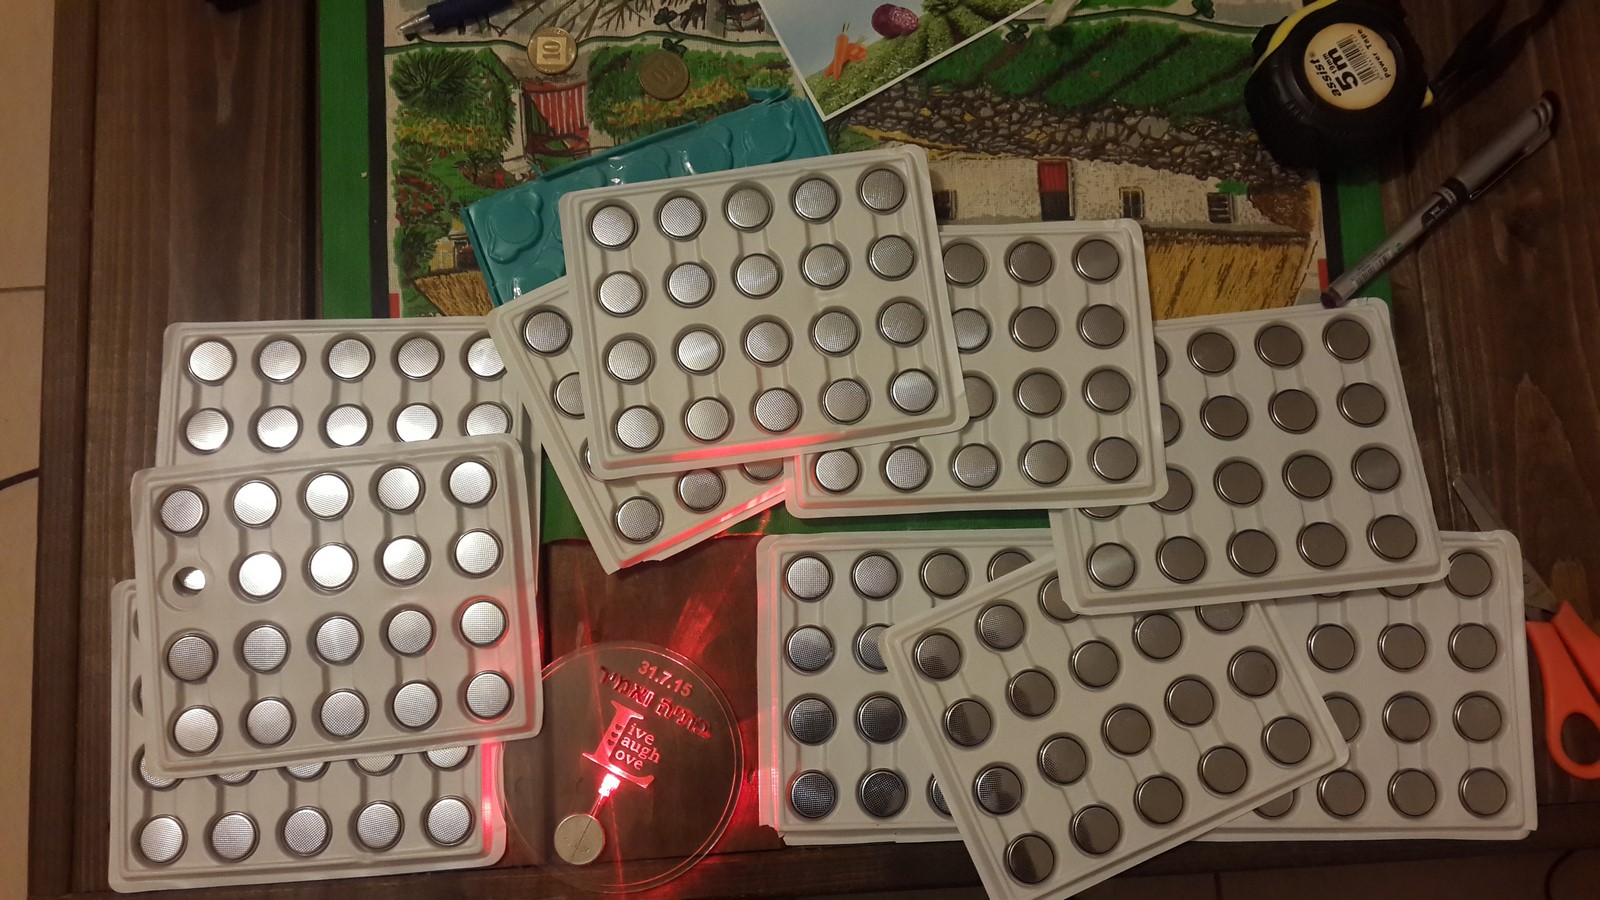
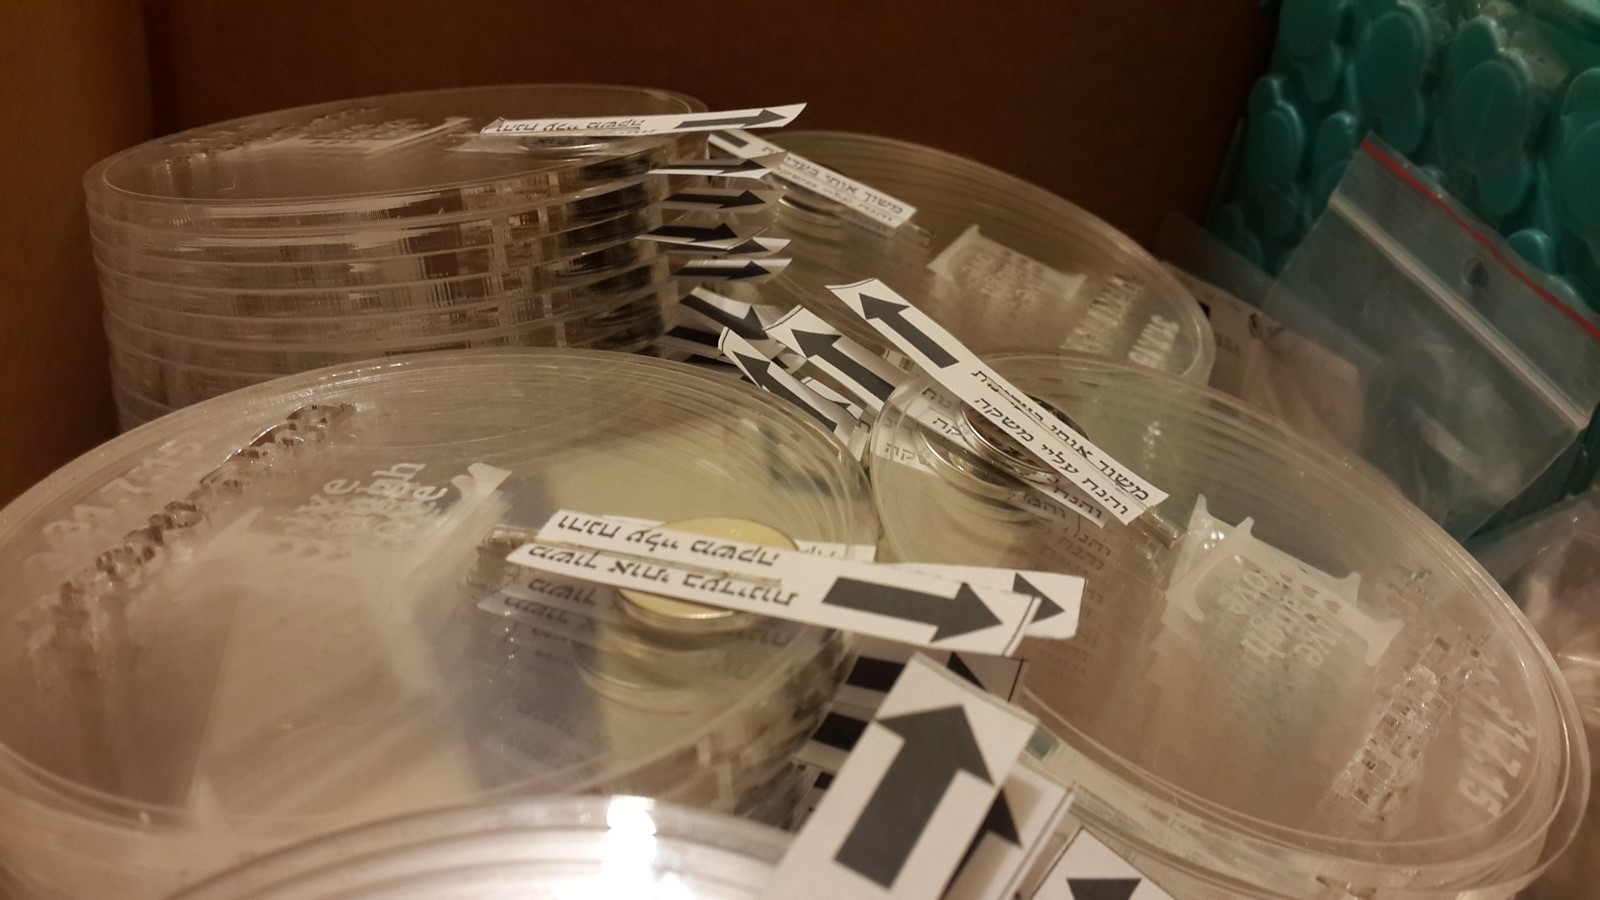
When a plate was done we removed the plate carefully and were left with the coasters:
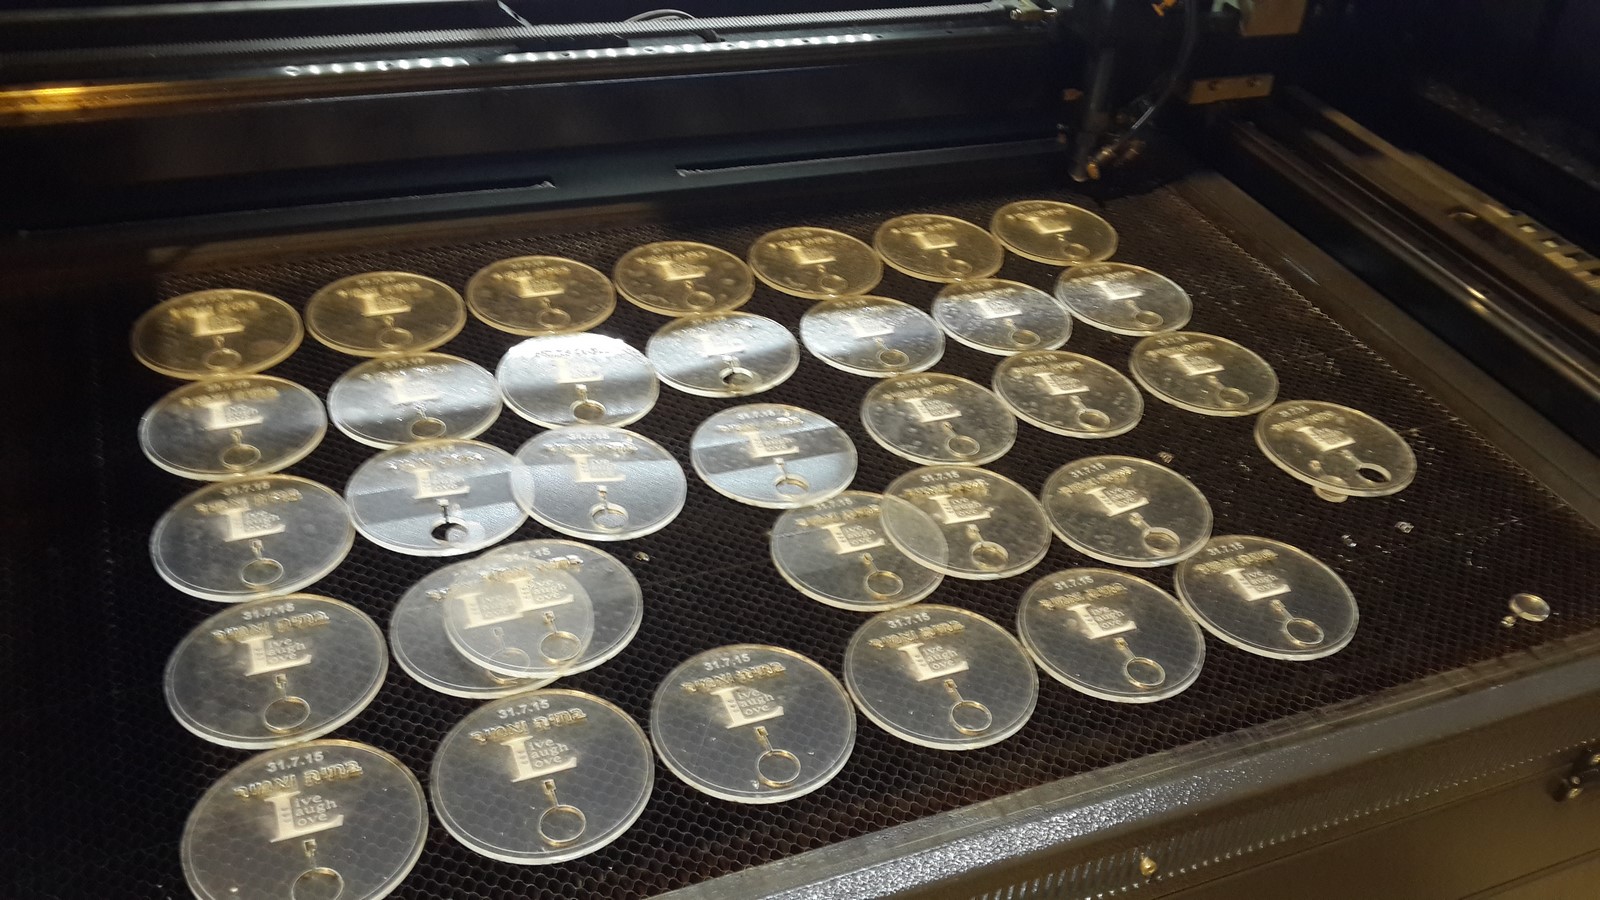
Then started piling them up, keeping the small cut pieces as well.
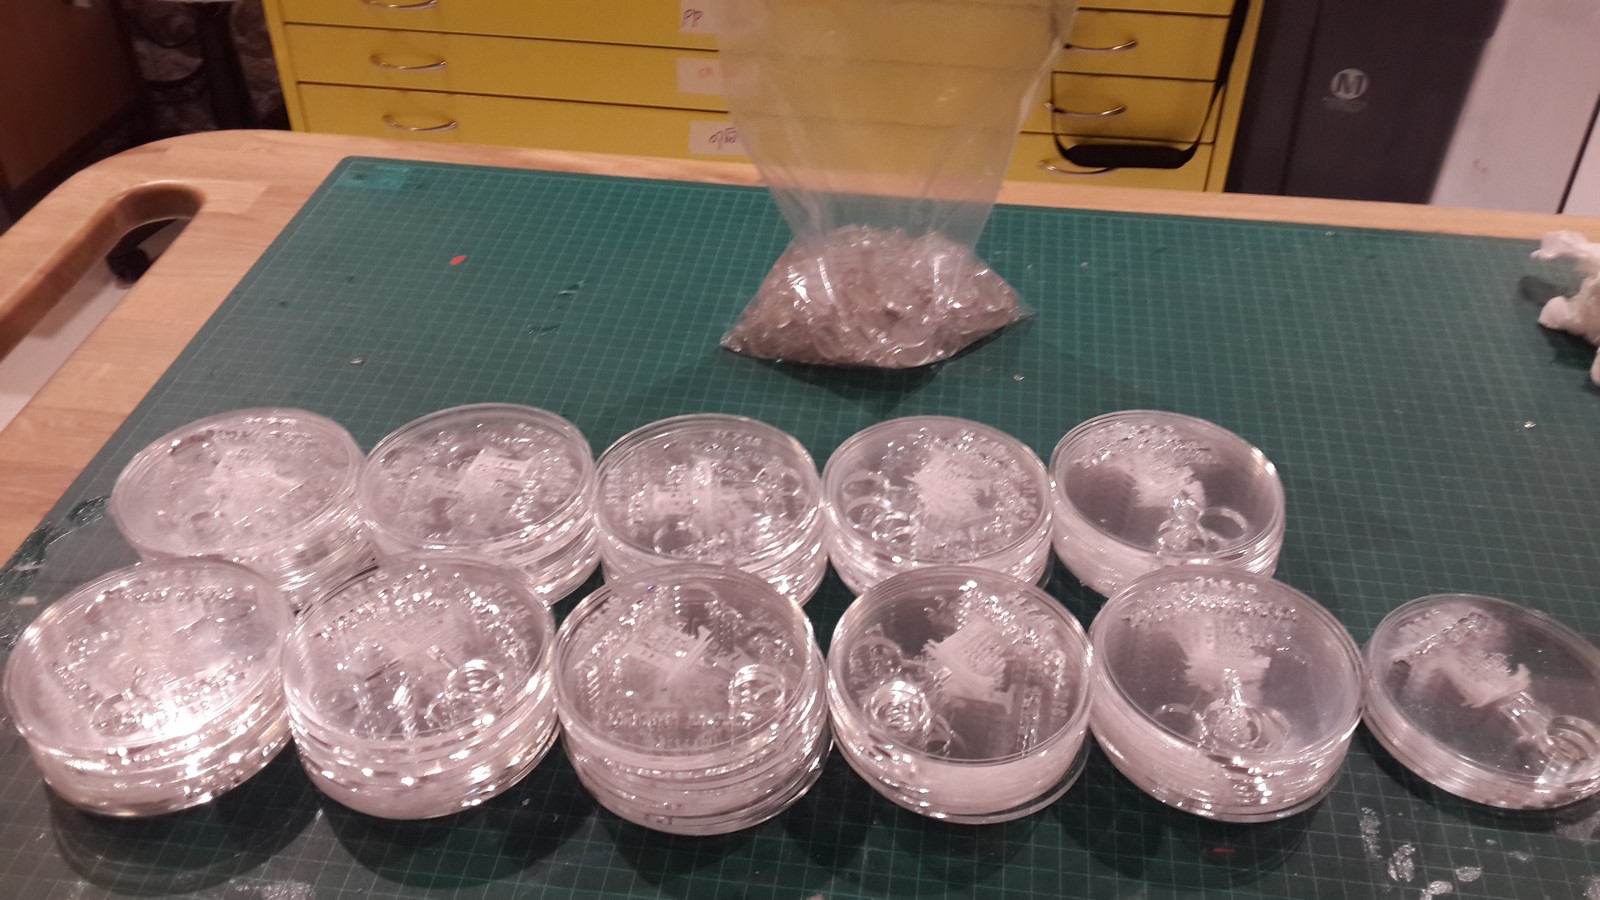
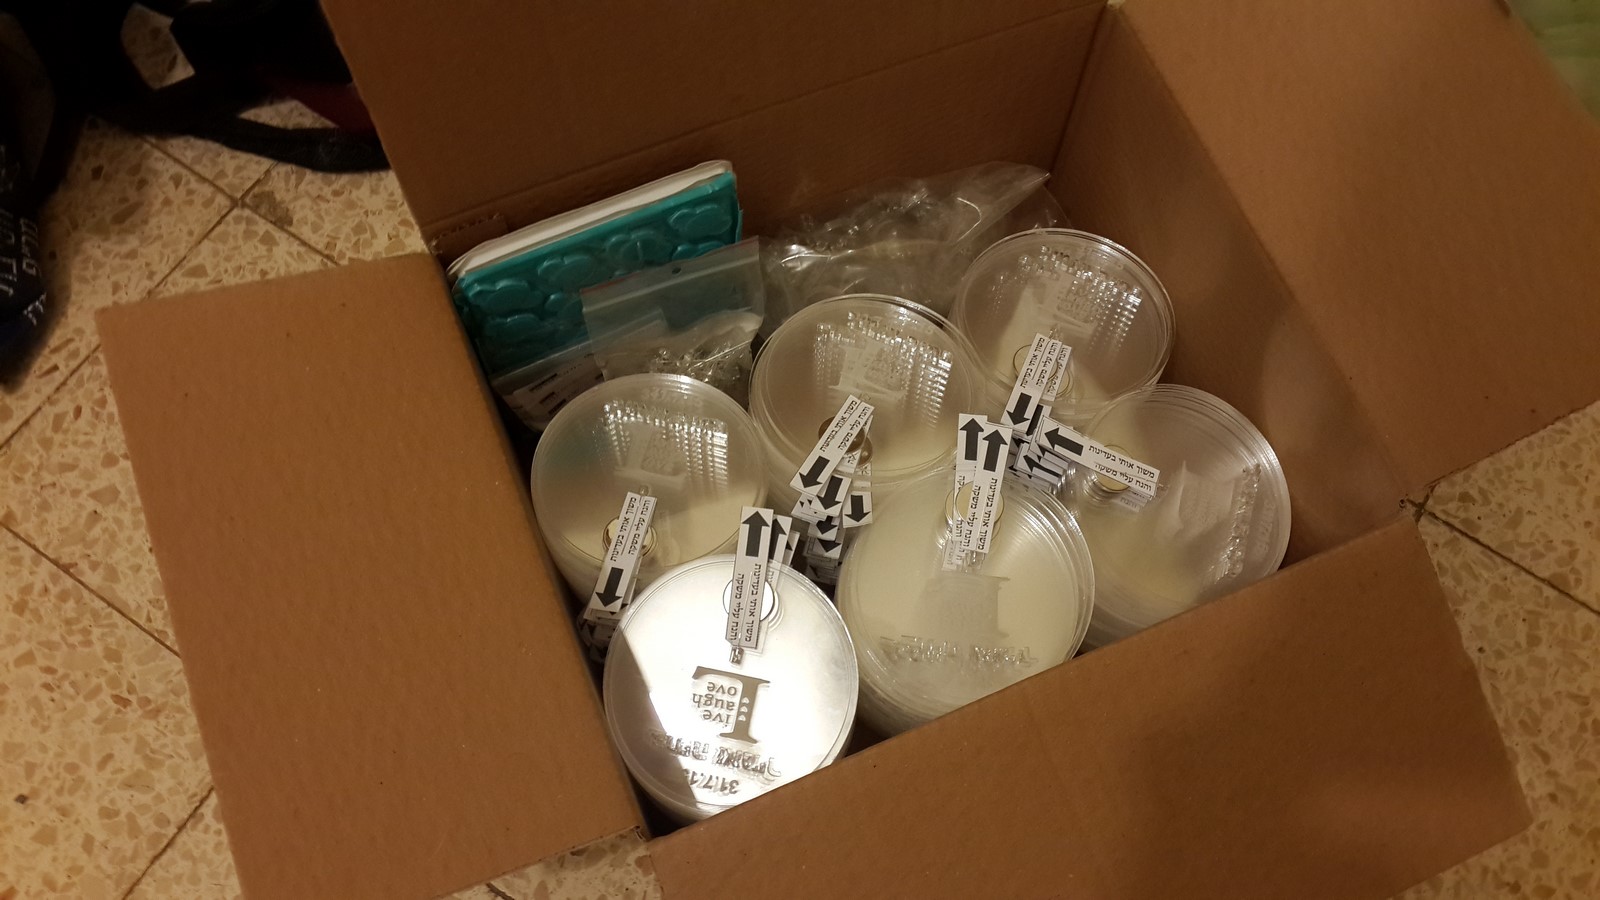
On July 22nd, the cutting procedure was done and I had everything I needed, things were finally starting to add up and the end was near. The following weekend, roughly a week before the wedding, two friends came over, I ordered pizza and put some music and we put together 140 coasters in several hours.
Before beginning the process we had to decide what would be the coasters' operation method. There were two options:
Put the led on the battery so it will fit tight, then put a small piece of paper in the front to open the circuit. When the piece of paper is pulled, the coaster lights up.
Put the led on the battery so its upper leg will be a bit loose. Then, the coaster will light up only when a glass is put on it (or when pressure is applied to it).
The second option sounded cooler, but less robust, with more risk of running into problems. So we decided to go with the first option.
The battery was a bit hard to put inside since the hole was at the exact size of the battery and the laser cutter has it's own cutting resolution. Sometimes it was very easy, but sometimes I had to force it with the back of a screwdriver in order to put it inside.
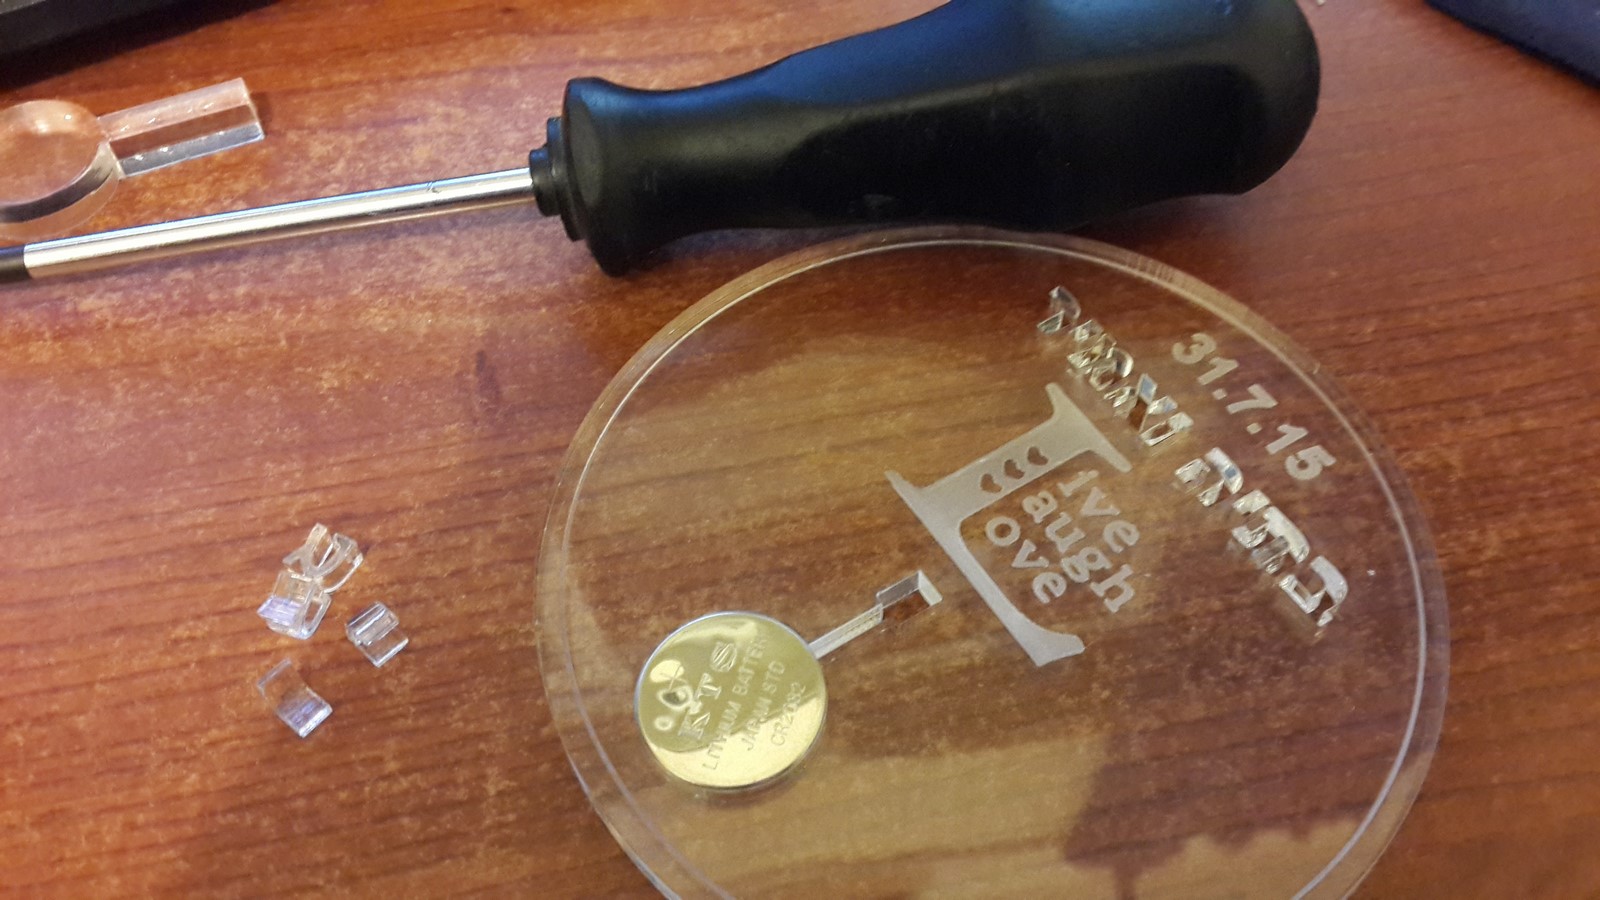
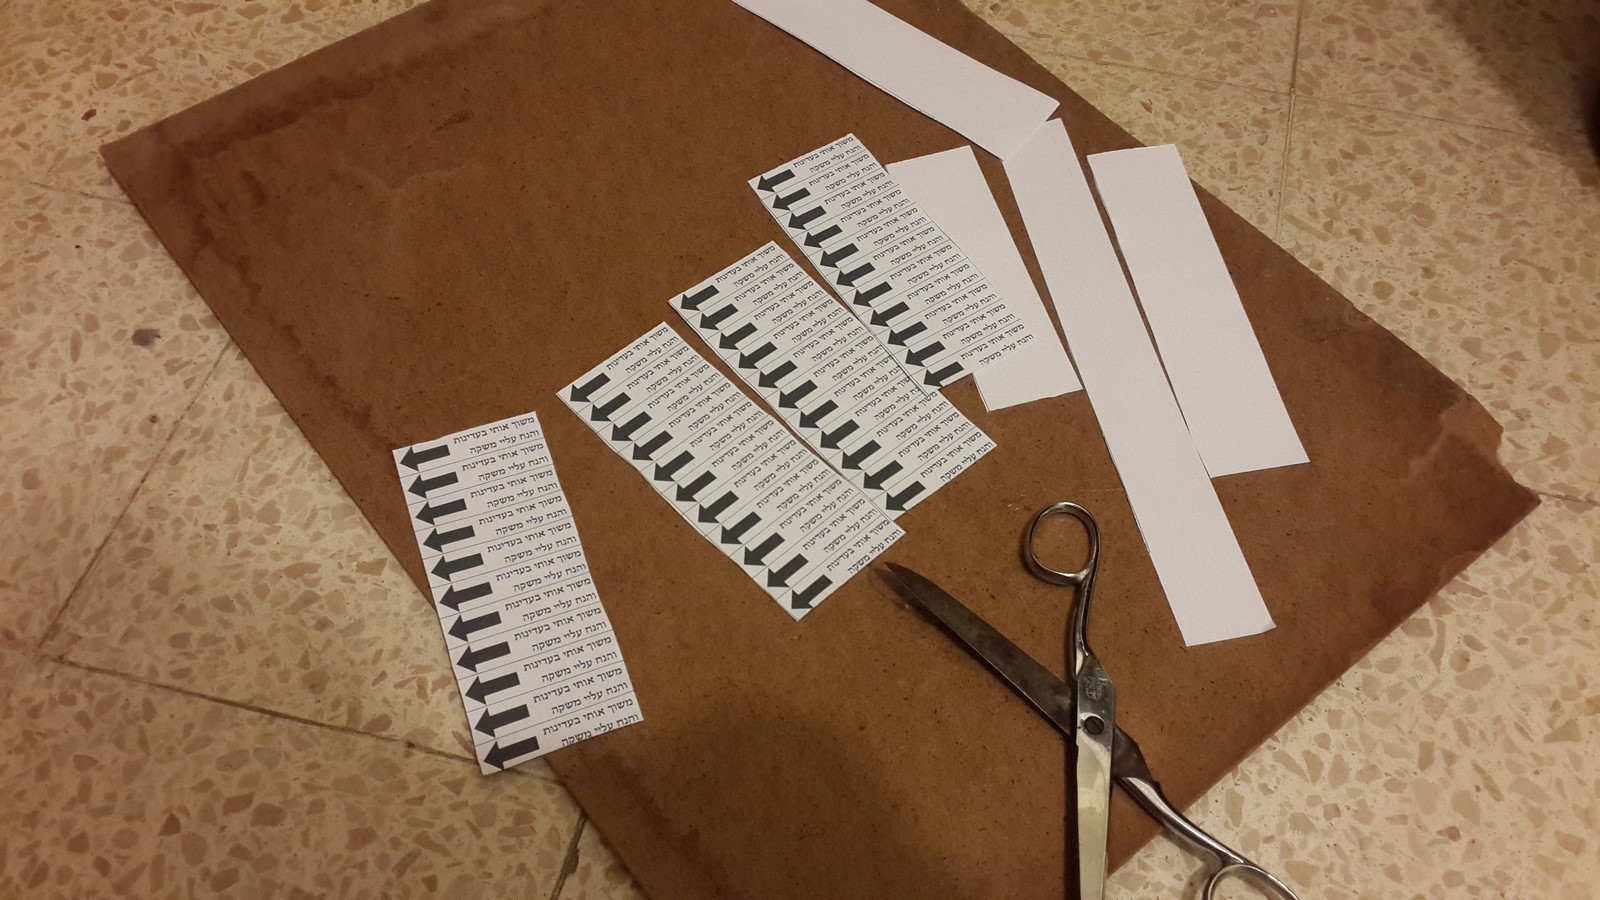
Next, we printed and cut small pieces of paper with the caption "Pull me gently and put a drink on me".
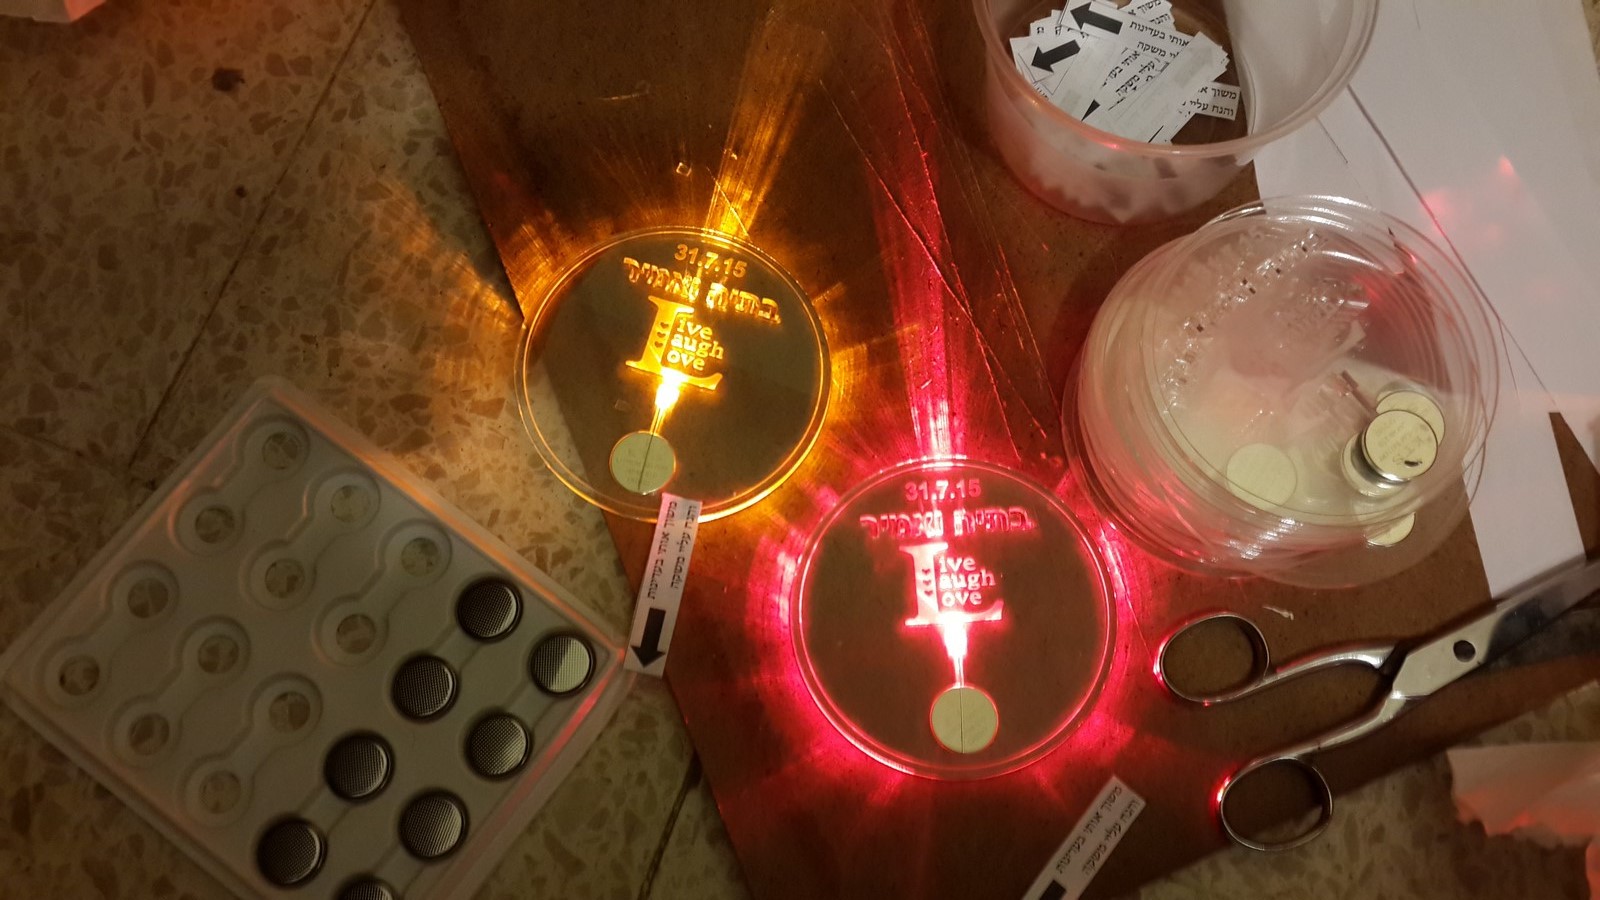
The battery was well-held and now we had to think what will be the best way to hold the led in its place. The led was not held as well as the battery because we intended for it to be easy for us to put everything together. After a few tries with several tapes and glues we came to the best option - Hot glue! Somehow it's always the best option. We put a small amount of hot glue at the back of the battery and pressed the led's leg on it with our thumbs.
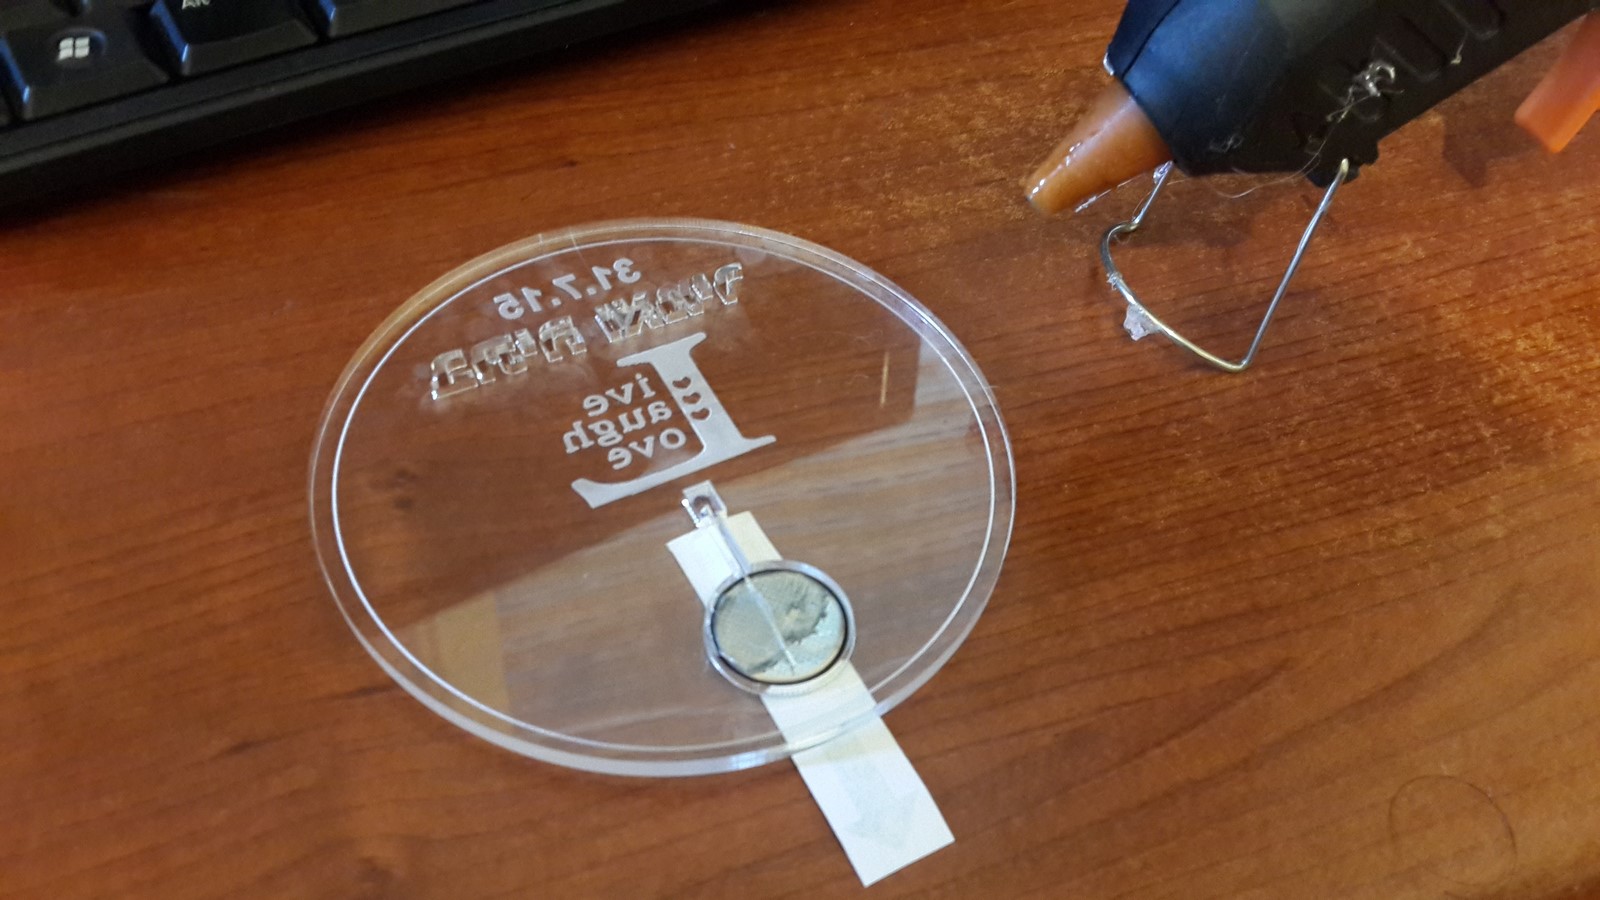
Then the paper was inserted and the product was ready
When the paper is pulled, the magic starts
After a few hours of hard labor, the gifts were ready
That's it! It took about five weeks from the first idea to working mass production products and we still had one more week until the Wedding.
The gifts were a big success at the Wedding, so I've heard. I didn't take any pictures since I was too busy with more important things during the Wedding (of course), but here are some pictures I managed to get:
My Tips (in Hindsight)
If you jump straight to this section, at least take a look at the pictures and videos - They are pretty nice. This project was very fun to make, but also very challenging. It was mostly challenging because of the time factor. Wedding planning is already a time consuming operation, so most couples usually decide to pay someone to make gifts for the guests. Like other couples, I found it very challenging to make this project step by step, facing problems, while I'm in the middle of planning a big event. Here are some tips from me to save time and money if you ever consider doing something like that:
Plan it as early as possible - In this case always remeber: time = money. If you don't have the time to make a proper check over the web, comparing websites, you'll have to buy your products in the local store near you and pay more, sometimes so much more you will give up the project.
Talk about it with many people - When it comes to creativity, you'll never know who will give you this massive idea which eventually will be the key-point to your project.
Learn ahead to use the programs you'll need - Luckily, I learned to use InkScape a few months ago while making another project posted here. If I didn't know how to use it, I would have to pay someone to do it for me since I didn't have the time to learn.
Aspire to get a single working product as fast as possible - Making a mass product could be very expensive and every small mistake can cost you a lot. It is important not to rush with this step and be sure your single item is exactly what you wanted to make.
Another short list for whoever skipped the entire post- Ingredients for 140 pieces, 10x10cm:
- 140 CR2032 batteries - Can get 200 for 30 USD on Amazon.
- 140 3mm super bright leds - can get 1 for 0.02 USD on Tayda electronics.
- About 110X160cm perspex plate (~5cm for borders). Check for a workshop near you - Shipping is terrible!
- Laser cutter - Can be found mostly in Fablabs, usually costs about 0.6-0.8 USD per minute of use.
- Good idea - Can be found in your head, priceless :)
AA