Most of the days, me and my roommate commute to work by car, and we get out at different times everyday (it dependence on when we wake up, usually I'm the one who oversleeps).
One day, my roommate had an idea:
Why won't we log the times we get out and arrive, that way we could find the optimal time to get out and skip the traffic
As an engineer and a data junkie I heard numbers and graphs, how could I resist it.
So the problem was: how to do it without much of coding and make it super easy and natural so that we would remember to do it every morning.
My first idea was OK we can attach a button to an ESP8266 and when I click it, it sends some server a request and the server logs the time of the request..
that way we have a centralized place with the data and no need to handle file-system problems on the ESP8266 (because I've never done it before.. note-to-self: maybe we need to make a post about it) or to worry about reboots that could occur because of power failure or other ESP8266 problems.
To be a good engineer, you need to think about what are you going to do before you actually do something, or as the ancient Chinese quote says: "measure twice cut once"
(which leads most of the time to not doing it at all)
So after some thought and the fact that I've had an ESP8266-07 , which meant that I needed to solder the pins and find a free breadboard, I thought that it's just too much work, and I'm a lazy maker.
I'll try to find an easier way out of it.
So naturally Arduino was a "no go" also, because now I need to connect the Arduino to some Ethernet module or a WiFi module like the ESP8266 or the CC3000 which as I said before was too much work.
My roommate even wrote some python code to read data from the serial port, so I gave up on those ideas.
Then I remembered that near me was a Raspberry-pi with the OS already installed and it was just laying around doing nothing.
The only thing I needed to do is to connect a button to the Raspberry-pi and take some opensource from the internet and adopt it to my needs :).
I used this circuit and code to get me started: Raspberry-pi basic GPIO tutorial
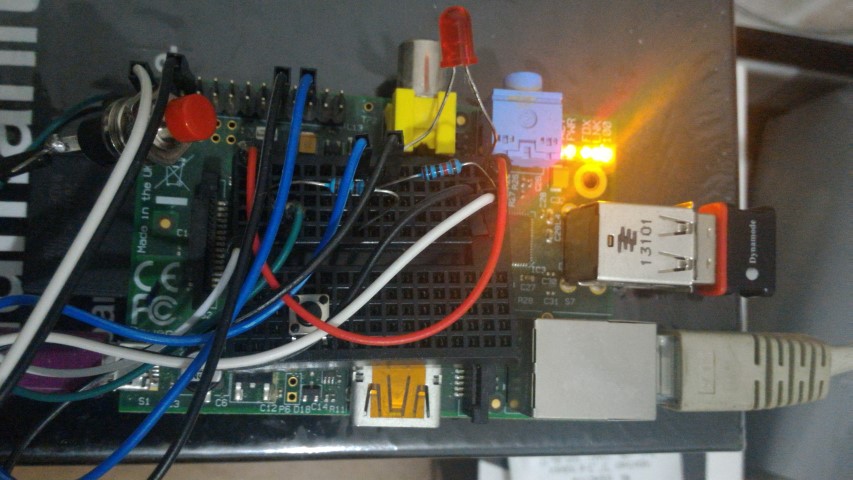 So now that we know how to connect the button to the Raspberry-Pi and we have a script that knows when the button is clicked we can move on.
So first of all I've used the code to log the date and time of the button click event locally on a file, here's the code : local button server Raspberry-pi code
Simple Explanation of the script
It's fairly simple, I'm using GPIO#24 and GPIO#25.
GPIO#25 is my button and GPIO#24 is a simple indication led.
When the button is clicked the led lights up so that I'll know that the button was indeed pressed and the Pi is alive. Also, it saves the time and date to a file named data.txt
In order to know for sure that the script is working I've made the led blink when you just start the script.
Installation guide for the Raspberry-Pi GPIO library for python:
If you haven't installed the python GPIO library here is a tutorial which helped me:
Install the GPIO library for python on Raspberry-pi
Run the script
To run it manually you need to run it as a super user because of the GPIO access
sudo python rpi_save_local_work_logger.py
Note about the Raspberry-Pi GPIO
In order to access the Raspberry-Pi GPIO pins you'll need (or the wrapper library that you are using would need) to access the hardware registers so that's always going to require very high privileges, like root privileges.
Pro tip: If you want this script to work at startup when the RPi boots up, you can edit the /etc/rc.local file and add this:
screen -dm -t "punch" bash -c "python /home/pi/<script_name>.py;sleep 10000"
Note that if you'd like to edit the /etc/rc.local file you'll need to use sudo privileges also. You can edit it by writing in terminal:
sudo vi /etc/rc.local or sudo vim /etc/rc.local or my favorite sudo nano /etc/rc.local
In order for this to work you'll need to acquire the screen command, which means you'll need to install it on a Debian based Linux
sudo apt-get install screen, or on fedora, CentOS and many more you'll install it usingsudo yum install screenWhat this command does is creates a virtual terminal so that if the connection or the terminal window you are currently using closed, the script still runs and you can open a new terminal and get back to the screen. the
-dmmeans detach screen,-tis the screen title,-cis the command that should run in this terminal and thesleep 1000was written for if the script fails you can see the error and it won't close immediately.After setting it up you could see the running screens using
screen -lscommand and connect to a screen usingscreen -x <screen_name>. To go out of a screen you clickCtrl + a then click d to detach from the screenYou can read more on "screen" in the man pages : screen(1)
So now that it runs we can try it out and see if it saves a file named data.txt with the time and date of when we clicked the button, after clicking the button make sure that the led does light up.
I've put it all inside the Rpi cardboard box
Before the button press
After the button press
So after everything started working and running, It wasn't enough because now it just logged the time that I got out of the house.
How would I log the time of my arrival?
This problem made me create a centralized server that should do the job and not save it locally so I've created a simple python server that has two functionalities to log the start and end times of the commute.
server-side python code
Here is the python server I am running on my remote server.
python server side code
The python server was super simple since I found a simple example on the internet and added a creation of a log file to log the time someone entered the server
Basically it just creates a simple server that all it does is :
if it gets the
/punchinit saves the date in a file calledpunch_in.txtif it gets the
/punchoutit saves the date in a file calledpunch_out.txt
To make sure the server keeps running after I'm done with the terminal session I'm using screen once again.
here is my command it's pretty much the same as before:
screen -dm -t "button_server" bash -c "python button_server.py;sleep 10000"
I've added a bash script to do just that : screen bash script
After creating this server I needed to change the python script on the Pi so that it would call the server and stop saving the data locally
fixed RPi code with remote server calls
You'll need to change line 27 in the code to the domain you are using :
conn = httplib.HTTPConnection("www.yourdomain.com",8000)
So now it works :) and it sends a request to the server to save the time and date and we have a simple site that you can access from the phone and save the time you arrive, just put it in your favorites!
The site looks like this...
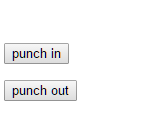
Told you I just wanted to save the dates.. nothing complicated :), so no energy was spent on the html part as well.
The problem is everything worked and it was great.. but I wanted to put this near the exit door so I won't forget to press the button, but the Pi made my life difficult :(.
I found out I had a problem such that when I disconnect the Ethernet from the Pi the WiFi stopped working as well..
It was super strange! After trying to fix it for hours I just gave up and came with a better idea!
(What did I tell you about thinking before doing something ?)
Plot Twist
After all the trouble I've had and the time I've spent making all of this, I had a revelation.
I decided to use the NFC tags that I got from a hackaton I've participated in the past. All I had to do is to take two tags and point them to the server that saves the time-stamps, and that's it :O ! My project was complete!
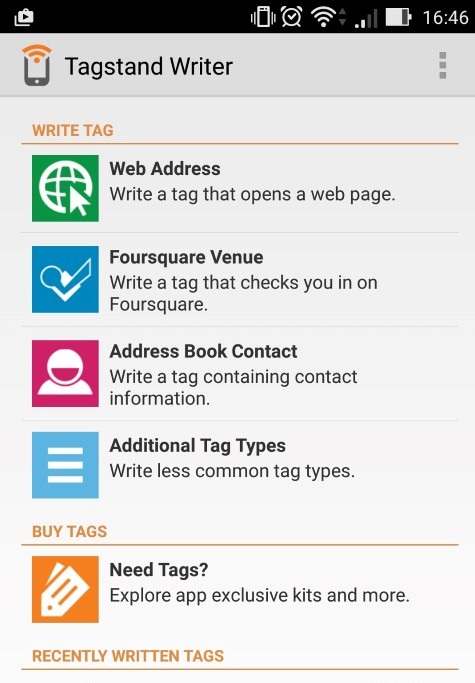
I have used an Android App which is called "Tagstand writer", which can write data to an NFC tag.
Step 1: Choose the Web address tag
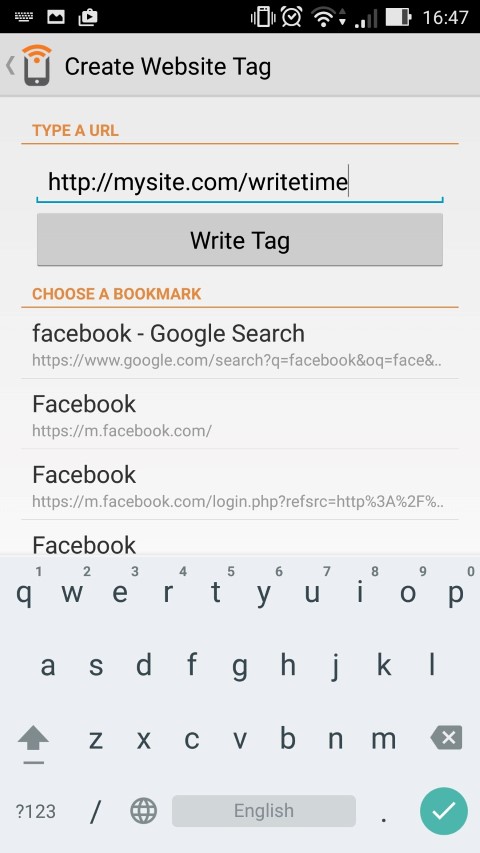
Step 2: Fill the site and click the Write tag button
Look at my NFC tags:
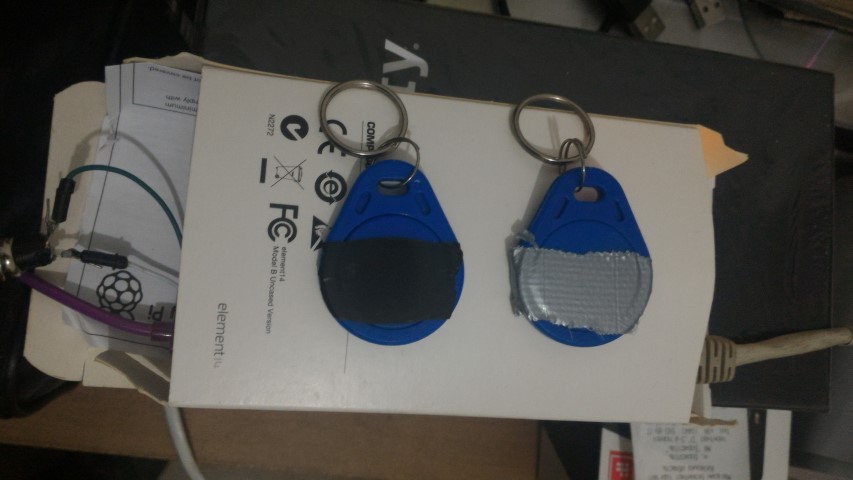 I've marked them so I'll know what is the "start the commute" tag and the "end of commute" tag.
I'm was disappointed that I haven't thought of that before. I've spent hours trying to fix the RPi bug without any success. By the way, if anyone has an idea you are welcome to help me... I'll tried some different Pi's and different versions of the OS but maybe it's just the driver for my wireless dongle that is acting up... But if you know anything please tell me, I'll try anything I haven't tried before.
Visualization : The most important part of the data
I've added a script that analyzed the data by day, month and year. It looks like this:
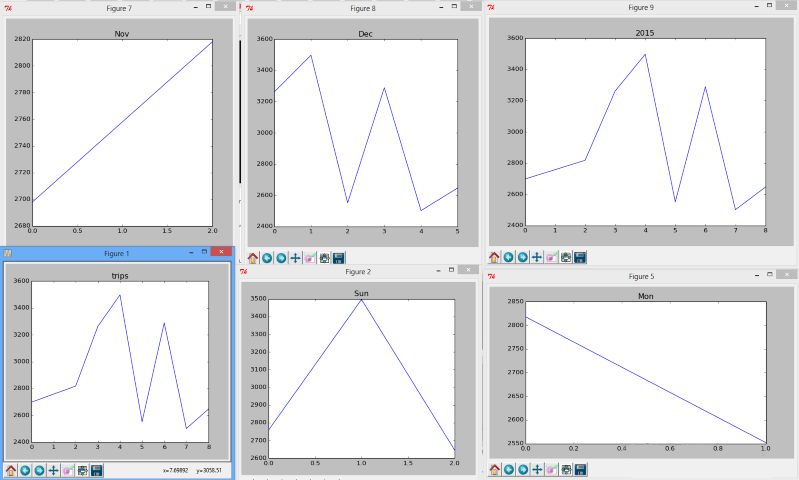 That's not a lot of data to visualize and learn something but it's a start :)
The scripts code
Hope you've learned something new and got some ideas!
See you in the Next part with lots of more data from other sensors!
By the way, Have you heard about our Facebook page already?
Like us and get updates!