Most of us use a phone app to see the temperature outside - which is fine if you don't mind receiving a reading from a sensor located at a meteorological station somewhere nearby.
And when we finally do set up our own IoT sensors, to see them, we need to open an app, or log onto a webpage.
No device needed
But what if you want to know the temperate outside your own house without opening a device? You want your outside temperature to be displayed permanently inside your house so that it's visible whenever you want, and anywhere you want to see it. (Even in multiple rooms...)
This post explains how to do it. A temp sensor outside sends its reading to a screen inside the house. It's all done with inexpensive components and a few wires and connections. If you already have a Raspberry Pi, you're already nearly there.
Components
- Two Wemos D1 minis - about $2 each.
- One SSD1306 0.96 inch screen - about $2.
- DS18B20 waterproof temp sensor - $1.
- 4.7k resistor
- Raspberry Pi running Node Red and MQTT (Any model RasPi will do, but if you're running a full Home Automation System, better a Pi 3+ or 4).
- Power supply for both Wemos chips. (I use an 18650 battery and solar panel for the outside sensor. More about that below.)
The Principle
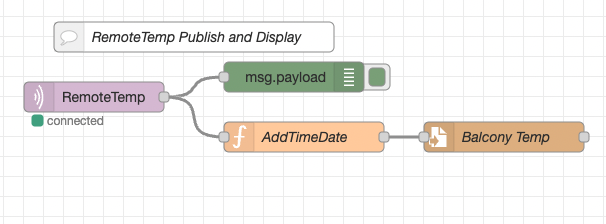
Every half an hour, (or other user-defined period) the outside Wemos D1 wakes from deepsleep, reads the temperature from the DS18B20, then transmits the data to the Raspberry Pi using the MQTT Publish protocol.
The RasPi MQTT server receives the data, then sends it to the MQTT Subscribed devices - in this case the other Wemos D1 mini(s). The latter then displays the temperature on the SSD1306 screen.
As it costs only about $3 for the Wemos/Screen setup, any number of these devices can be placed around your house and they'll all update simultaneously.
Setting up the RasPi
I won't explain here how to install Node Red and MQTT onto a RasPi. Rui Santos over at Random Nerd Tutorials does it much better than me..
Two things I'd emphasize:
- Understand the concepts of Subscribing and Publishing in MQTT as we'll be using them when programming our Wemos D1 minis.
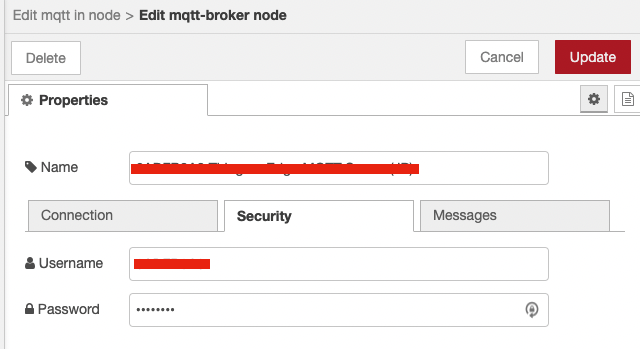
- In the MQTT server, if you give yourself a username and password you'll need to use them in your Wemos sketch. You place them under "Security" in the MQTT node in Node Red.
Setting up the Wemos D1 mini with the DS18B20 temp sensor
The DS18B20 is a really simple sensor to work with. When you buy it, make sure you get the waterproof version as the indoor version won't last long exposed to the elements. Connect the sensor to the Wemos as follows:
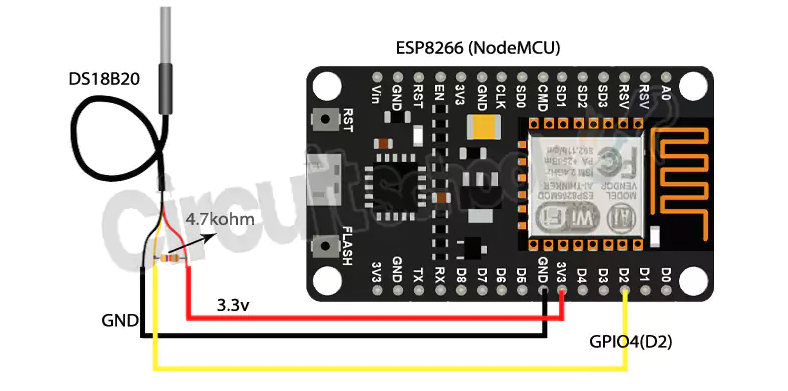 (This is a NodeMCU, but it's the same principle as the Wemos. Connect the 4.7k resistor as a pull-up for the sensor pin. Make sure you use the correct pin numbers in your own script below.)
Setting up the Wemos D1 mini with the SSD1306 screen
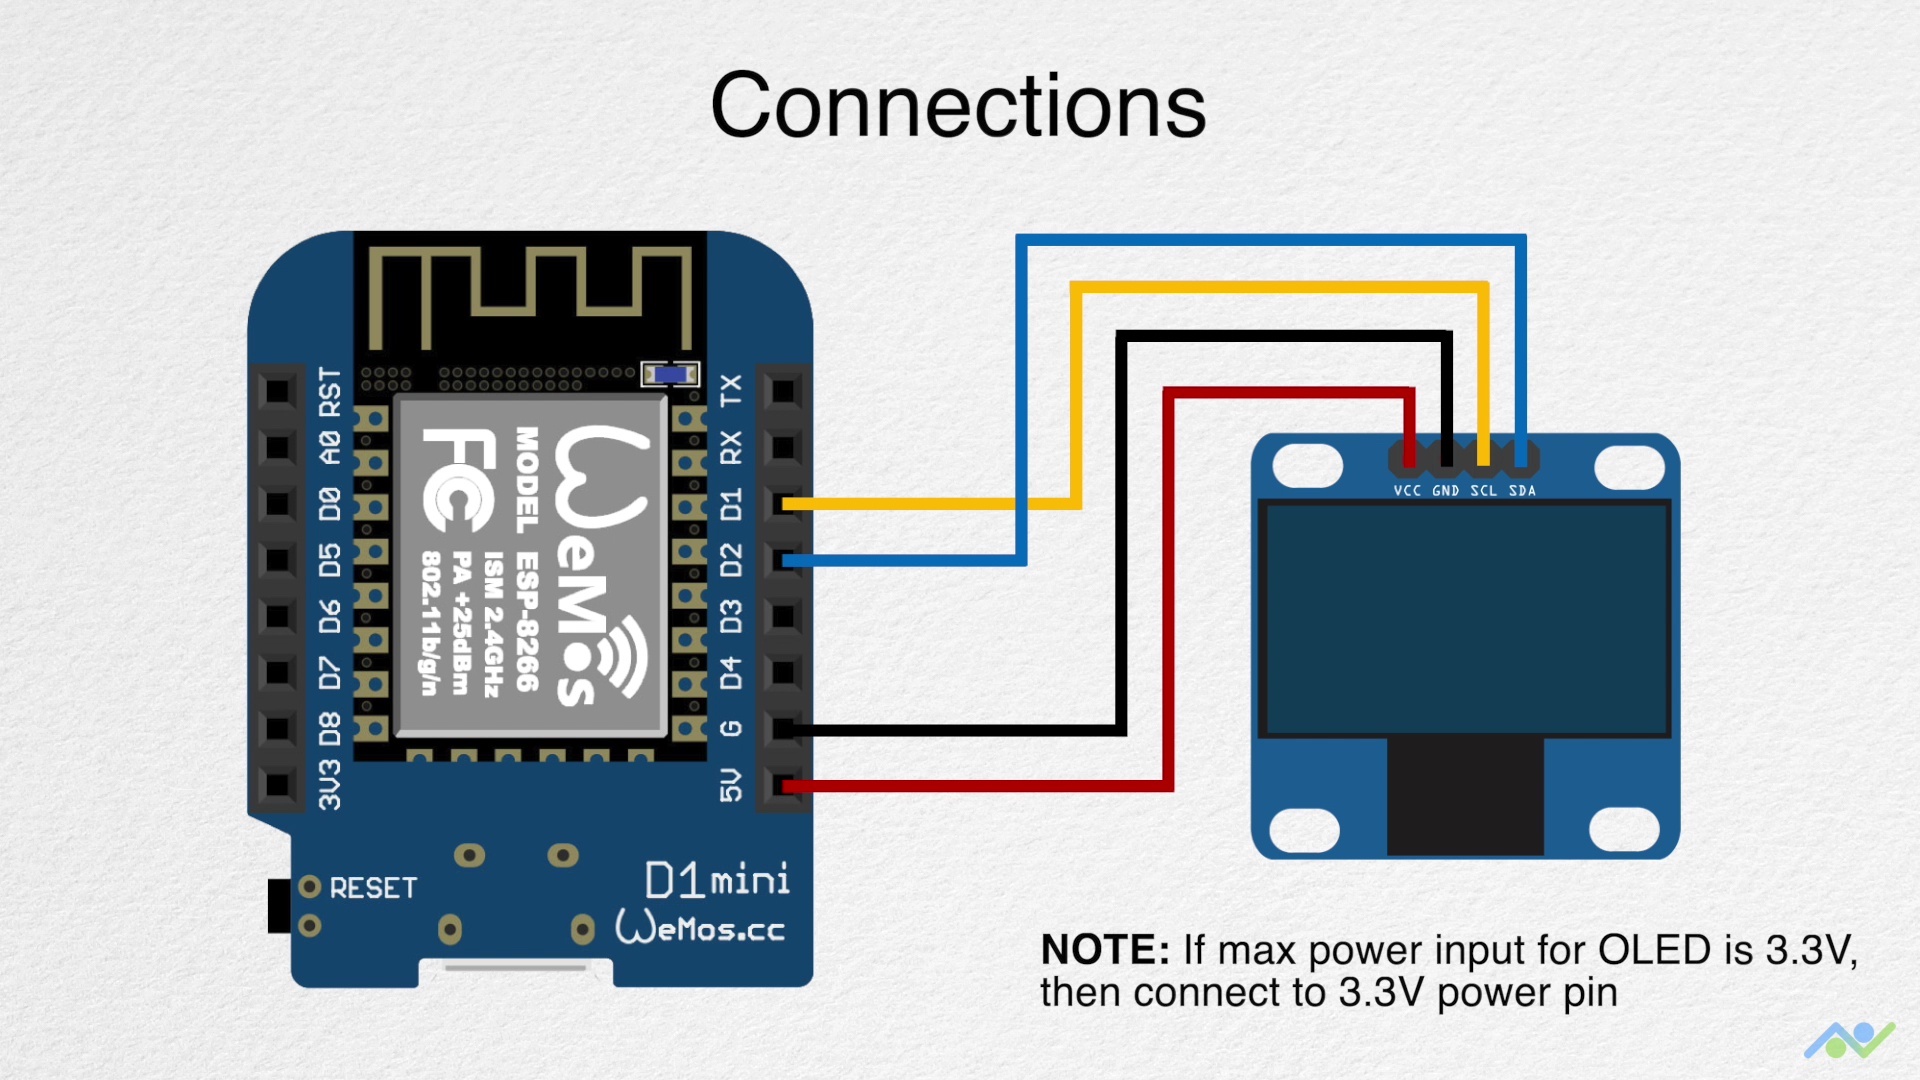 In my setup, I have the SSD1306 connected the the Wemos 3.3v output. Check before connecting. Wiring diagram courtesy of Bits and Bobs
The Outside Sensor Script
This script wakes up from deepsleep every 30 minutes, reads the DS18B20, connects to Wifi, and Publishes the MQTT data to a topic on the Raspberry Pi Node Red/MQTT server.
You need to write your WiFi credentials in the script, as well as your username and password for your MQTT server, and the topic you've chosen.
// Michael Diamond and Allan Shwartz

#include <OneWire.h>            // to connect to the OneWire temp. sensor
#include <DallasTemperature.h>  // temperature sensor driver
#include <ESP8266WiFi.h>        // for WiFi Client class
#include <PubSubClient.h>       // for MQTT PubSubClient class

// Update these with values suitable for your network.

const char *ssid = "Your_WiFi_Name_Here";       // your WiFi name goes here
const char *password = "Your_WiFi_Password_Here";    // your WiFi password goes here
const char *mqtt_server = "192.168.x.x"; // IP address of the MQTT server/Raspberry PI
// Declaration of (instantiation of) a WiFiClient called espClient
WiFiClient espClient;

// Declaration of (instantiation of) a PubSubClient called client
PubSubClient client(espClient);

// GPIO where the DS18B20 temperature sensor is connected to
const int oneWireBus = 2;

// Setup a OneWire instance to communicate with any OneWire devices
OneWire oneWire(oneWireBus);

// Pass our OneWire reference to Dallas Temperature sensor
DallasTemperature sensors(&oneWire);

// constants needed for millisecond timing
const unsigned long SECOND = 1000;
const unsigned long MINUTE = (60 * SECOND);
// Push data at this interval
const unsigned long deepSleep_ms = 30 * MINUTE;


//----------------------------------------------------------------------
//  setup() function
//
//  ... setup the Serial class, the Wifi, and the Publish-Subscribe Client
//----------------------------------------------------------------------
void setup()
{
    // start the Serial Monitor
    Serial.begin(115200);
    // setup the temperature probe
    pinMode(2, OUTPUT);
    // setup the networking functions
    setup_wifi();
    client.setServer(mqtt_server, 1883);
    // Start the DS18B20 temperature sensor
    sensors.begin();
}


// ----------------------------------------------------------------------
//  setup_wifi() function
//
//  ... connect this ESP node to the House WiFi network
//      we only call this once at "setup-time"
//----------------------------------------------------------------------
void setup_wifi() {

    delay(10);
    // We start by connecting to a WiFi network
    Serial.println();
    Serial.print("Connecting to ");
    Serial.println(ssid);

    WiFi.mode(WIFI_STA);
    WiFi.begin(ssid, password);

    while (WiFi.status() != WL_CONNECTED)
    {
        delay(500);
        Serial.print(".");
    }

    randomSeed(micros());

    // networking is successfully up
    Serial.println("");
    Serial.println("WiFi connected");
    Serial.println("IP address: ");
    Serial.println(WiFi.localIP());
}


//----------------------------------------------------------------------
//  reconnect() function
//
//  ... The connection to the MQTT server must constantly be checked
//      if it is down, reconnect
//----------------------------------------------------------------------
void reconnect()
{
    // Loop until we're reconnected
    while (!client.connected())
    {
        Serial.print("Attempting MQTT connection...");
        // Give each ESP its own client name. If they are all the same, it'll repeatedly connect.
        String clientId = "RemoteTempSensor";

        // Attempt to connect
        if (client.connect("Your_topic", "your_MQTT_user", "you_MQTT_PW"))
        {
            Serial.println("connected");
            // Once connected, publish an announcement...
            //     client.publish("Your_topic", tempString, "ºC");
        }
        else
        {
            // if our connection attempt fails, print some debugging to the Arduino console
            Serial.print("failed, rc=");
            Serial.print(client.state());
            Serial.println(" try again in 5 seconds");
            // Wait 5 seconds before retrying
            delay(5 * SECOND);
        }
    }
}


//----------------------------------------------------------------------
//  loop() function
//
//  ... actually the most important function here.
//----------------------------------------------------------------------
void loop()
{
    // we must be vigilant in keeping our MQTT connection up
    if (!client.connected())
    {
        reconnect();
    }

    // call the loop function of the Publish-Subscribe client
    client.loop();

    // now read the temperatures
    sensors.requestTemperatures();
    float temperatureC = sensors.getTempCByIndex(0);

    // display on the Arduio console ... just as a debugging tool
    Serial.print(temperatureC);
    Serial.println("ºC");

    // we need to convert this into a text string to transmit
    char text[8];
    dtostrf(temperatureC, 1, 1, text);

    // publish this text to our MQTT server
    client.publish("Your_topic", text, "ºC");
    delay(SECOND);   // to insure the packet gets out

    // now go into a power-saving deep sleep for 30 minutes
    ESP.deepSleep(deepSleep_ms);
}
The Inside Sensor Script
This script is Subscribed to the topic of the outside sensor on the Node Red/MQTT server. When the outside sensor Publishes, the server on the Pi sends the data to this (and all other Subscribed devices on this topic). Once the data is received, the sketch displays the result to the attached SSD1306 screen.
Here too you need to write your WiFi credentials in the script, as well as your username and password for your MQTT server, and the topic you've chosen.
// Michael Diamond and Allan Shwartz

#include <Wire.h>             // to connect to I2C screen
#include <Adafruit_GFX.h>     // for screen graphics
#include <Adafruit_SSD1306.h> // for Adafruit_SSD2306 class
#include <ESP8266WiFi.h>      // for WiFiClient class
#include <PubSubClient.h>     // for MQTT PubSubClient class
#define SCREEN_WIDTH 128      // OLED display width, in pixels
#define SCREEN_HEIGHT 64      // OLED display height, in pixels

// Declaration for an SSD1306 display connected to I2C (SDA, SCL pins)
Adafruit_SSD1306 display(SCREEN_WIDTH, SCREEN_HEIGHT, &Wire, -1);

// Update these with values suitable for your network.

const char *ssid = "Your_WiFi_Name_Here";       // your WiFi name goes here
const char *password = "Your_WiFi_Password_Here";    // your WiFi password goes here
const char *mqtt_server = "192.168.x.x"; // IP address of the MQTT server/Raspberry PI

// Declaration of (instantiation of) a WiFiClient called espClient
WiFiClient espClient;

// Declaration of (instantiation of) a PubSubClient called client
PubSubClient client(espClient);

// constants needed for millisecond timing
const unsigned long SECOND = 1000;
const unsigned long MINUTE = (60 * SECOND);

//----------------------------------------------------------------------
//  setup() function
//
//  ... setup the Serial class, the Wifi, and the Publish-Subscribe Client
//----------------------------------------------------------------------
void setup()
{
    // start the Serial Monitor
    Serial.begin(115200);
    // setup the networking functions
    setup_wifi();
    client.setServer(mqtt_server, 1883);
    // set the callback function ... to be called when we get a message
    client.setCallback(callback);
}


//----------------------------------------------------------------------
//  setup_wifi() function
//
//  ... connect this ESP node to the House WiFi network
//      we only call this once at "setup-time"
//----------------------------------------------------------------------
void setup_wifi()
{
    delay(10);
    // We start by connecting to a WiFi network
    Serial.println();
    Serial.print("Connecting to ");
    Serial.println(ssid);

    WiFi.mode(WIFI_STA);
    WiFi.begin(ssid, password);

    // continue to try to connect to the WiFi, showing connection attempts
    while (WiFi.status() != WL_CONNECTED)
    {
        delay(500);
        Serial.print(".");
    }

    // networking is successfully up
    Serial.println("");
    Serial.println("WiFi connected");
    Serial.println("IP address: ");
    Serial.println(WiFi.localIP());
}


//----------------------------------------------------------------------
//  callback() function
//
//  ... we have received a message from the MQTT server
//      display it.  repaint the SSD1306 screen
//----------------------------------------------------------------------
void callback(String topic, byte *payload, unsigned int length)
{

    Serial.print("Message arrived on topic: ");
    Serial.print(topic);
    Serial.print(". Message: ");

    // the payload is a "byte-stream".  Convert this to a printable String object
    String message;
    for (int i = 0; i < length; i++)
    {
        message += (char)payload[i];
    }
    Serial.println(message); // debug print on our Arduino console

    // We have our RemoteTemp MQTT message, we want to display

    if (topic == "Your_topic")
    {

        // restart the SSD1306 screen with a call to .begin()
        if (!display.begin(SSD1306_SWITCHCAPVCC, 0x3C))
        {   // Address 0x3D for 128x64
            Serial.println(F("SSD1306 allocation failed"));
            for (;;)
                ; // infinite loop on failure
        }

        // repaint the SSD1306 OLED screen using various Adafruit_SSD1306 functions
        delay(50000); // delay 50 seconds (otherwise is blinks too much)
        display.clearDisplay();
        display.setTextColor(WHITE);
        display.setTextSize(1);
        display.setCursor(2, 0);
        display.println("Temperature Celcius");
        display.setTextSize(4);
        display.setCursor(10, 20);
        // Display static text
        display.println(message); // This is the content to display
        display.display();
    }
}


//----------------------------------------------------------------------
//  reconnect() function
//
//  ... The connection to the MQTT server must constantly be checked
//      if it is down, reconnect
//----------------------------------------------------------------------
void reconnect()
{

    // Loop until we're reconnected
    while (!client.connected())
    {
        Serial.print("Attempting MQTT connection...");
        // Give each ESP its own client name. If they are all the same, it'll repeatedly connect.
        String clientId = "Your_topic";

        // Attempt to connect
        if (client.connect("TopicName", "Your_MQTT_User", "Your_MQTT_Password"))
        {
            Serial.println("connected");
            client.subscribe("Your_topic");
        }
        else
        {
            // if our connection attempt fails, print some debugging to the Arduino console
            Serial.print("failed, rc=");
            Serial.print(client.state());
            Serial.println(" try again in 5 seconds");
            // Wait 5 seconds before retrying
            delay(5 * SECOND);
        }
    }
}


//----------------------------------------------------------------------
//  loop() function
//
//  ... actually the most important function here.
//----------------------------------------------------------------------
void loop()
{
    unsigned long loopTime_ms = millis();

    // we must be vigilant in keeping our MQTT connection up
    if (!client.connected())
    {
        reconnect();
    }

    // call the loop function of the Publish-Subscribe client
    client.loop();

    // we want to do this "loop" function once a minute
    while ((unsigned long)(millis() - loopTime_ms) < (1 * SECOND))
        ;   // wait for the minute to be over
}
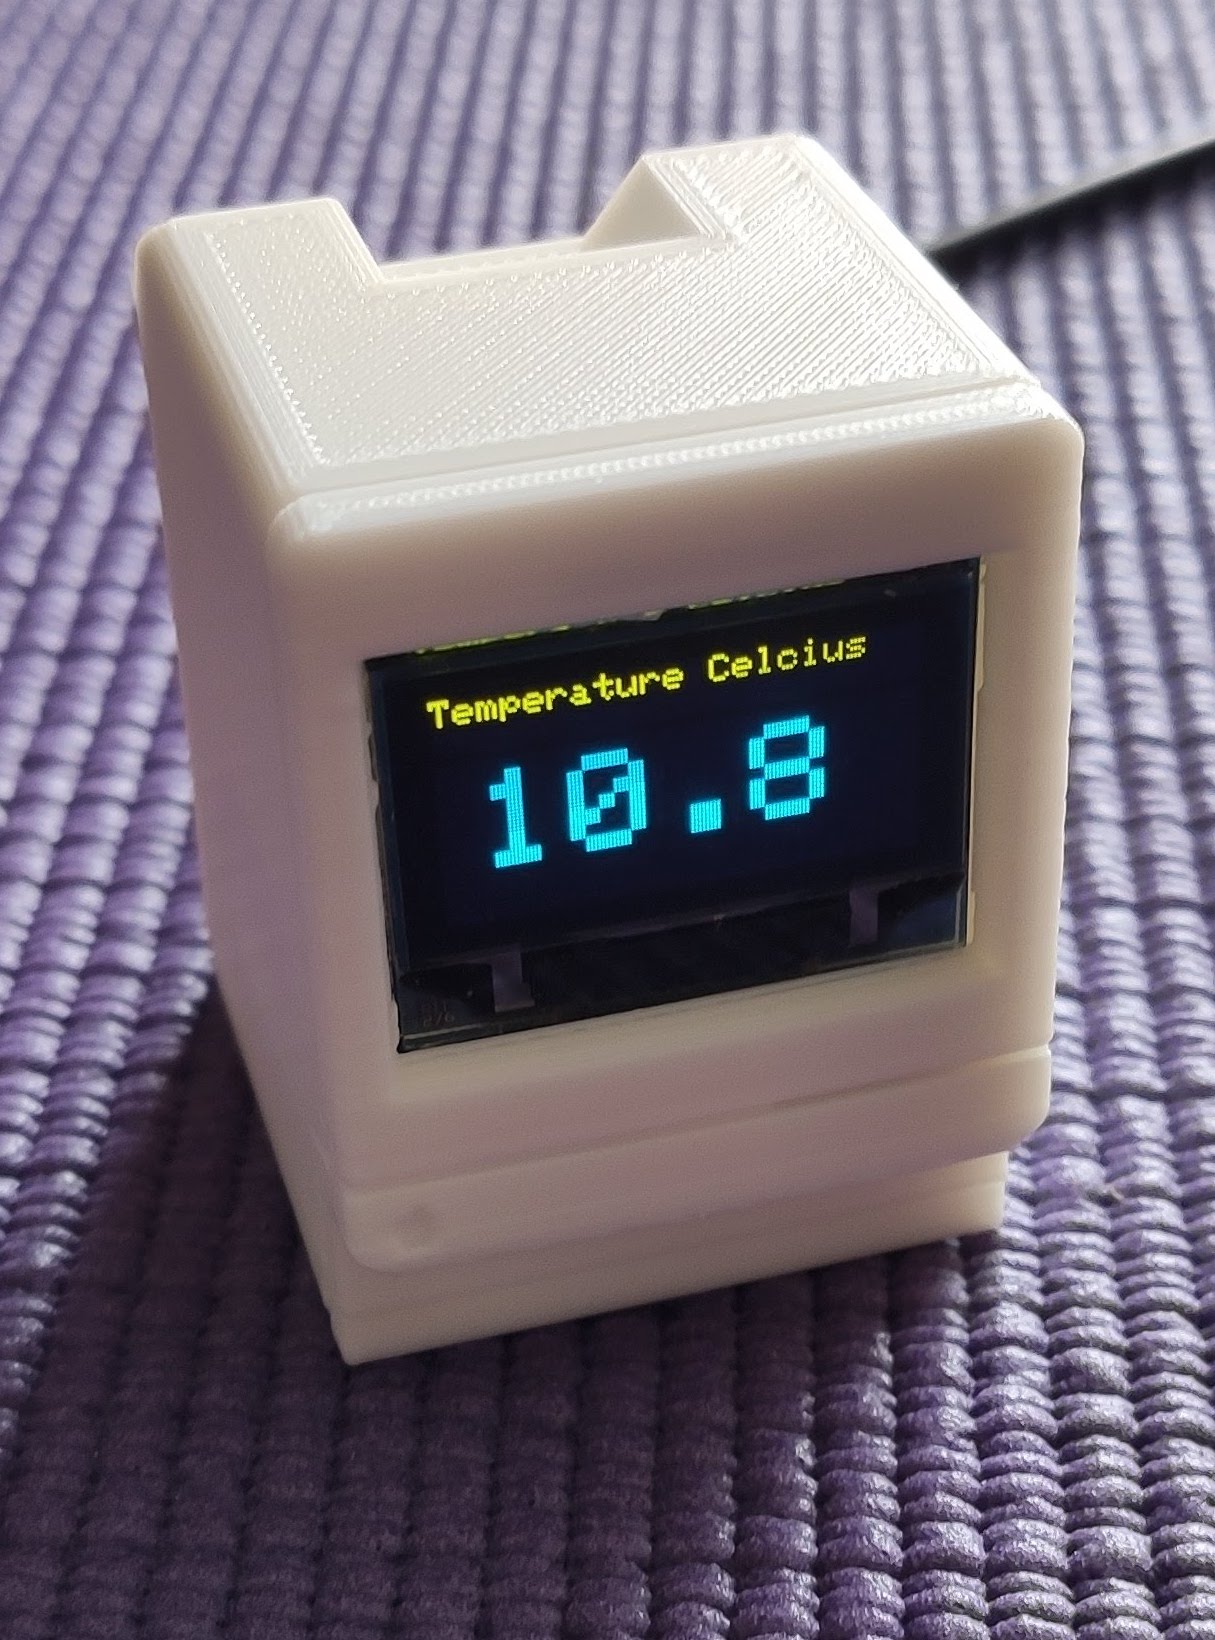
I 3d-printed a neat little box for the screen. You can download the stl files here.
Triggering other things
As I'm sure most readers are aware, with the outside sensor connecting to Node Red, it's very simple to use the incoming data to trigger anything else in your network. For example, if it gets too hot, the AC will come on. If it gets too cold, the heater will come on.
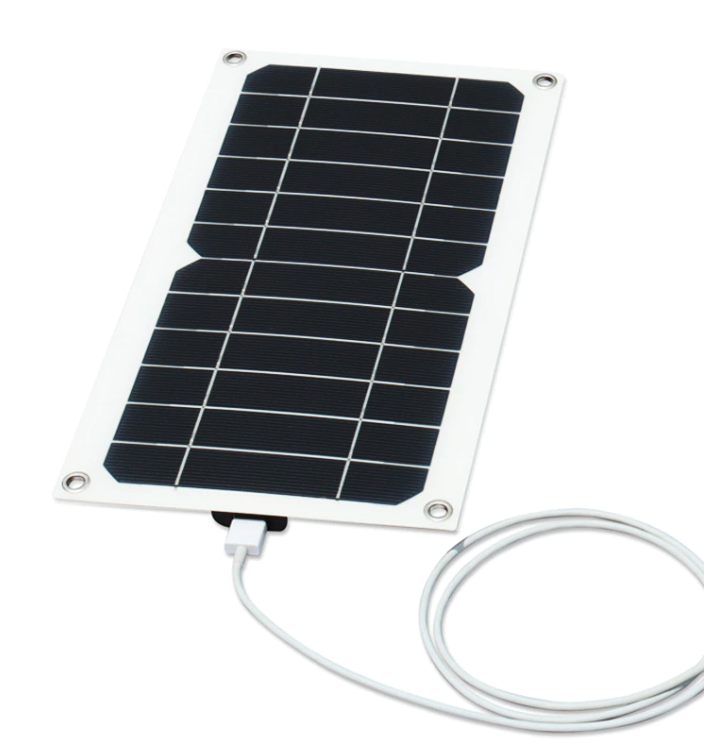
Powering the Outside Wemos with Solar Panel
Due to its relatively high current drain during WiFi activation, the ESP8266 is notoriously difficult to power remotely. I got around this relatively easily.
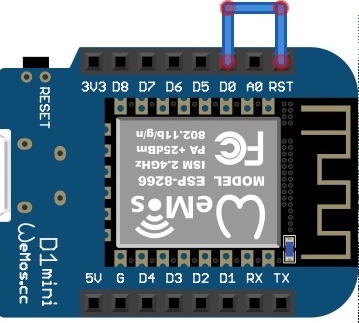
First, by bridging pins RST and D0 on the Wemos, the board can enter full deepsleep. This means there is negligible power consumption between each wakeup.
Second, I've used an inexpensive 18650 board that powers the Wemos through the USB output - and also controls battery charge and discharge.
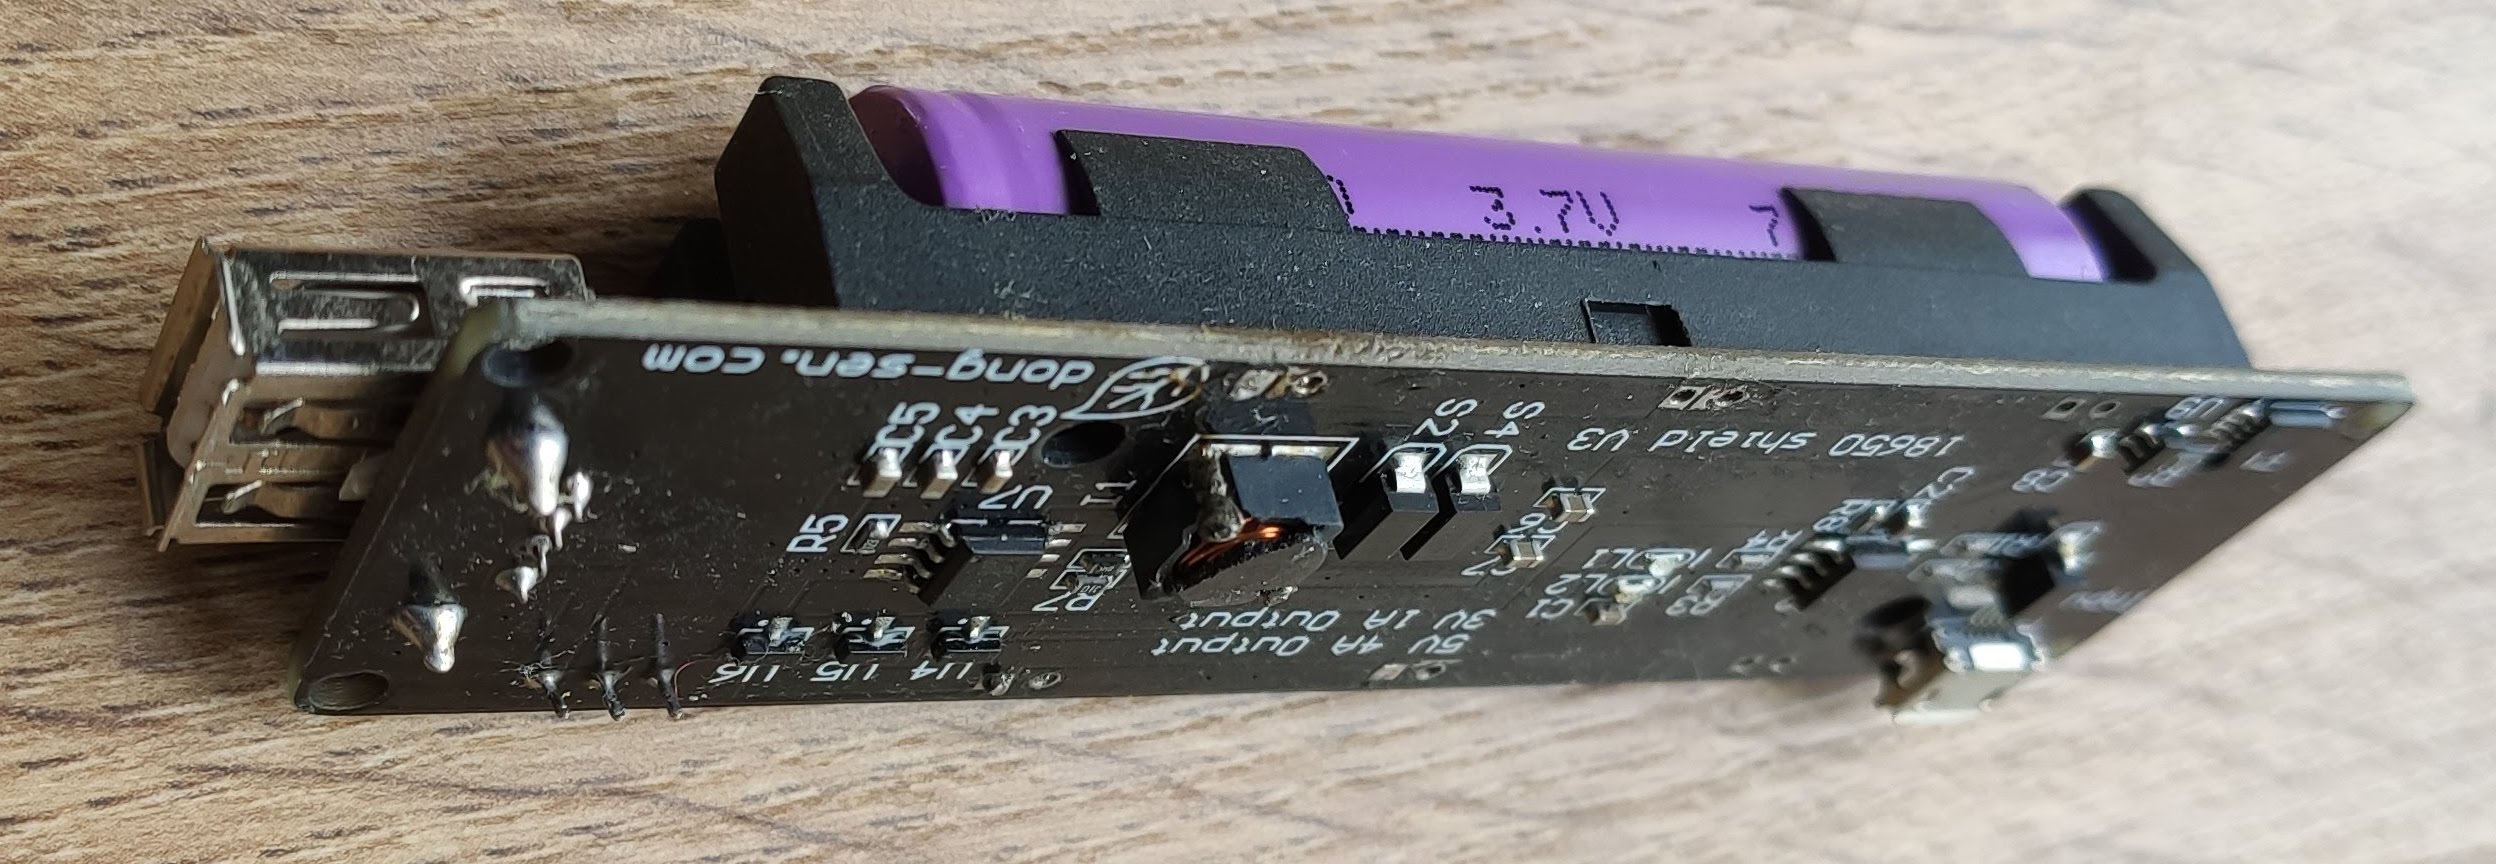
Third, I used a small solar panel from Aliexpress that outputs 5v from its USB. This plugs into the 18650 board above. My system has run for nearly two years without a problem.
All Around the House
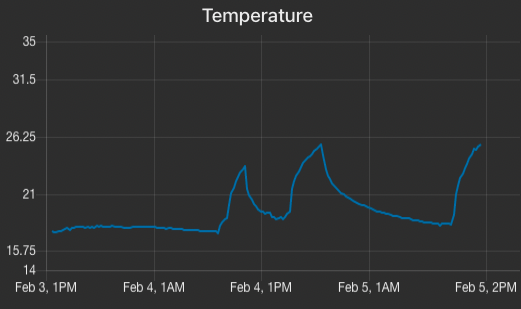
I placed little screens all around the house making it easy for me to keep track of the outside temperature without fiddling with my phone. I find myself looking at it regularly. I also added a flow to Node Red that records the incoming data in a text file. Another flow displays a graph of the last 48 hours.