One of the first commercial home automation devices I bought was a hot water boiler switch from Switcher. Like most remote devices, it came with its own app. At the time - about 5-6 years ago - it was nigh-on impossible to hack into the protocol to connect to it in any other way.
For years, as my house became smarter and smarter, the boiler remained a conundrum. Our blinds would lower if the sun got bright, and our AC automatically kept us cool. Lights would turn off at bed time, and garden sprinklers would work only on dry days.
But the boiler was stuck to rigid rules, completely unconnected to climatic conditions. I prayed that one day I could make it turn on when clouds obscured our solar panels, or when the temperature fell below a set threshold.
Today, after much sweat, trial and effort, that changed. Today, for the first time, my Node Red commanded my Switcher to turn on, then turn off - and I danced around the hallway with glee.
This is how I did it
A couple of notes first:
- I run my Node Red on a Raspberry Pi 3+ - which makes things a little easier for this tutorial. I'm sure it can be done on other platforms but that's beyond my current scope.
- My Switcher is Version 2 (35DA), running Firmware version 72.36. The library I used has only been tested on Switcher Version 3 (and now V2!) - so there's hope if you have a different version.

- Make sure you're running your Node Red and Switcher on the same Wifi network. I don't know if it works between the 5gHz and 2.4 bands, but mine is all running on 2.4.
Getting Switcher's Identity
This part uses the Python script written by Aviad Golan (@AviadGolan) and Shai rod (@NightRang3r) on this github. On their page, they have a really long description, most of it irrelevant if you don't use Home Assistant. All you really need to do is copy switcher.py to your Raspberry Pi, then move to the directory you copied it to.
Once there, run the following command:
sudo python switcher.py discover
This should give you a screen that looks something like this:
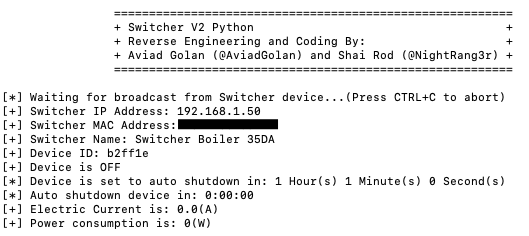
From this screen, note down the Device ID and the IP address for later.
Using Nodejs Library
Now that you have the Device ID and IP address, we move over to johnathanvidu's github here.
Step 1:
On the Raspberry Pi running your Node Red, go to the Node Red directory. This is usually acquired by
cd .node-red/
Once there, type:
npm install switcher-js
You may need "sudo" to run this.
This will install the necessary nodejs library in the appropriate place in your Node Red setup.
Step 2:
We're about to change the "settings" file of Node Red. As this is crucial to its operation, you might want to make a backup before you do anything.
While still inside the .node-red directory, type
cp settings.js settings.bkup
Then edit the "settings" file with this:
sudo nano settings.js
Inside the settings file, look for the line functionGlobalContext. (It's a long way down).
Directly below functionGlobalContext type:
switcher: require('switcher-js').Switcher
Once this is done, it should look like this:
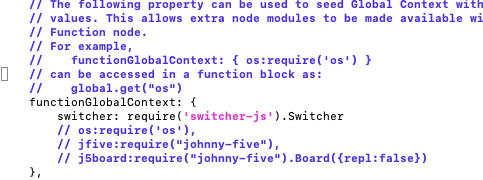
Syntax is hugely important so make sure all your commas and cases are right. Close and save.
Step 3:
Now we're going to set up Node Red, but before we do so, I suggest rebooting your pi so that the above changes are implemented.
We're about to use a Function Node. The nodejs code for importing is at the foot of this page.
In Node Red, open a new Function Node and use this code for turning on:
const Switcher = global.get('switcher');
//complete with your data
var switcher = new Switcher('yourDeviceID', 'yourIP','0000','00000000', console);

switcher.on('state', (state) => { // state is the new switcher state

});
switcher.on('error', (error) => {
    msg.payload = error;
    console.log(error)
});

switcher.turn_on();

return msg;
and this one for turning off
const Switcher = global.get('switcher');
//complete with your data
var switcher = new Switcher('yourDeviceID', 'yourIP','0000','00000000', console);

switcher.on('state', (state) => { // state is the new switcher state

});
switcher.on('error', (error) => {
    msg.payload = error;
    console.log(error)
});

switcher.turn_off();

return msg;
Use a regular Inject Node to activate.
Error Message
Your Switcher should now be working with Node Red. For reasons I don't understand, I still get this error message on a debug node:
"Error: status report failed. error: bind EADDRINUSE 0.0.0.0:20002"
Google says it's an authorization problem, but with everything working as it should, I just ignore it.
Connecting to Weather
My Node Red follows the weather for my location. Now that I can control my boiler, my weekend project will be to set it up to turn on the water heater only when inclement weather dictates.
Good luck!
Update - 2 weeks later
Not only is my hot water boiler now weather-dependent, but the nodes worked so well that I connected my drip irrigation too. (Irrigation isn't connected to Switcher, but once I'd worked out how to make the boiler weather-dependent, it was very simple to apply the same nodes.) Now the irrigation won't come on if it has rained in the last six hours.
Update - 4 weeks later
We had a power outage and suddenly Switcher stopped working in Node Red. After a bit of fiddling, I realized that its IP address must have changed. I used "switcher.py discover" again, and found it had moved. This time I noted down the device's MAC address, and gave it a static IP address in my router. Once I updated the flow, it came back to life.
Nodejs for importing:
[{"id":"59c46b3.2b3fb94","type":"function","z":"67d04cec.e90134","name":"Turn on","func":"const Switcher = global.get('switcher');\n//complete with your data\nvar switcher = new Switcher('yourDeviceID', 'yourIP','0000','00000000', console);\n\nswitcher.on('state', (state) => { // state is the new switcher state \n \n});\nswitcher.on('error', (error) => {\n msg.payload = error;\n console.log(error)\n});\n\nswitcher.turn_on();\n\nreturn msg;","outputs":1,"noerr":0,"initialize":"","finalize":"","x":940,"y":180,"wires":[[]]},{"id":"7a008aa2.8411a4","type":"inject","z":"67d04cec.e90134","name":"Turn on Switcher","props":[{"p":"payload"},{"p":"topic","vt":"str"}],"repeat":"","crontab":"00 07 * * *","once":false,"onceDelay":0.1,"topic":"","payload":"","payloadType":"date","x":730,"y":180,"wires":[["59c46b3.2b3fb94"]]},{"id":"acd82843.d6b578","type":"function","z":"67d04cec.e90134","name":"Turn off","func":"const Switcher = global.get('switcher');\n//complete with your data\nvar switcher = new Switcher('yourDeviceID', 'yourIP','0000','00000000', console);\n\nswitcher.on('state', (state) => { // state is the new switcher state \n \n});\nswitcher.on('error', (error) => {\n msg.payload = error;\n console.log(error)\n});\n\nswitcher.turn_off();\n\nreturn msg;\n","outputs":1,"noerr":0,"initialize":"","finalize":"","x":940,"y":240,"wires":[[]]},{"id":"1732c821.3bb2d8","type":"inject","z":"67d04cec.e90134","name":"","props":[{"p":"payload"},{"p":"topic","vt":"str"}],"repeat":"","crontab":"30 07 * * *","once":false,"onceDelay":0.1,"topic":"","payload":"","payloadType":"date","x":750,"y":240,"wires":[["acd82843.d6b578"]]}]