About a year ago I posted a blog describing how to log temperature straight to google sheets from a DS18B20 temperature sensor.
New Version
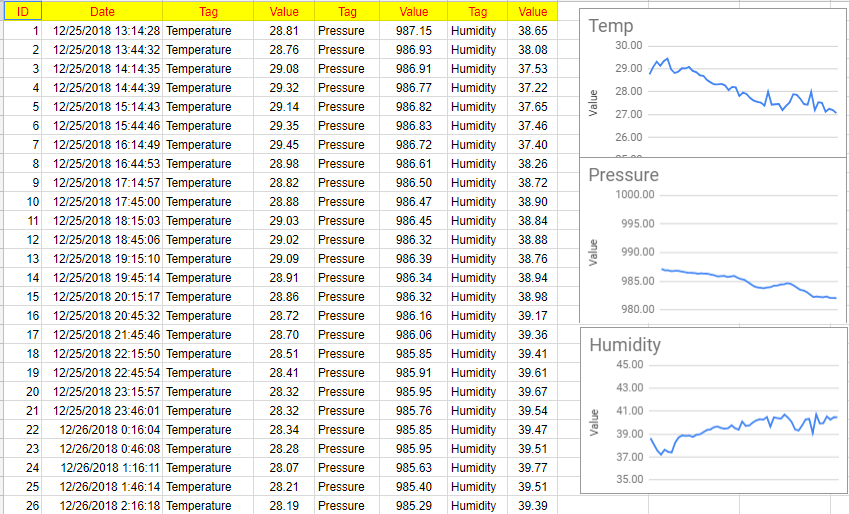
This blog is an extension of the first, using much the same technique, but this time logging Temperature, Humidity and Air Pressure from a BME280 sensor and presenting it in a single row in Google Sheets.
I also describe below how I prepared the BME280 for deployment outdoors.

My thanks from co-blogger Allan Schwartz for getting his head around the code needed for the ESP8266 used in the project, and for altering the Google Sheets script.
Original Coding
As I did in my last post, I refer you to the excellent work explained in Embedded Lab. We'll be adapting their coding to display several data points in a single row of our spreadsheet.
ESP8266 Code
Personally, I use the ESP8266 01 for simple projects like this. I only need two GPIO pins and the 01 - being tiny, cheap, and unobtrusive - does just the job.
Below is the code to be flashed to the ESP.
A couple of things to note:
- Sometimes - depending on your device - the address of the BME needs to be altered from its default of 0x77 to 0x76.
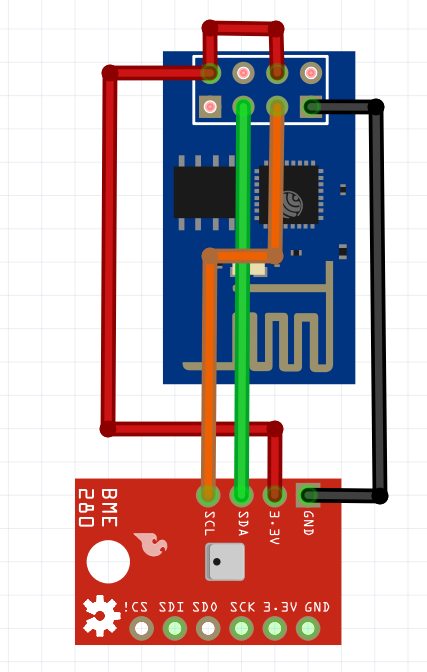
- We are using the ESP GPIO pins 0 and 2 for I2C communications. Make sure you get your pins the right way around.
// BY: Akshaya Niraula
// ON: Nov 11, 2016
// AT: http://www.embedded-lab.com/
// BME by Allan Schwarz

#include <ESP8266WiFi.h>
#include "HTTPSRedirect.h"

#include <Wire.h> //BME
#include <SPI.h>  //BME
#include <Adafruit_Sensor.h> //BME
#include <Adafruit_BME280.h> //BME

// #define SEALEVELPRESSURE_HPA (1013.25) //BME - for Calculating elevation based on air pressure

Adafruit_BME280 bme; // I2C //BME
//Adafruit_BME280 bme(BME_CS); // hardware SPI
//Adafruit_BME280 bme(BME_CS, BME_MOSI, BME_MISO, BME_SCK); // software SPI

unsigned long delayTime; //BME


const char* ssid = "Your_WiFi";
const char* password = "Your_WiFi Password";

// The ID below comes from Google Sheets.
// Towards the bottom of this page, it will explain how this can be obtained
const char *GScriptId = "Your_Code";

const char* host = "script.google.com";
const char* googleRedirHost = "script.googleusercontent.com";

const int httpsPort =  443;
HTTPSRedirect client(httpsPort);

// Prepare the url (without the varying data)
String url = String("/macros/s/") + GScriptId + "/exec?";

const char* fingerprint = "F0 5C 74 77 3F 6B 25 D7 3B 66 4D 43 2F 7E BC 5B E9 28 86 AD";

void setup() {
  Serial.begin(9600);
  Wire.begin(0, 2); // SDA, SDL
  bme.begin();

  bool status;

  // default settings
  // (you can also pass in a Wire library object like &Wire2)
  status = bme.begin(0x76); //BME
  if (!status) {
    Serial.println("Could not find a valid BME280 sensor, check wiring!");
    while (1); //BME
  }

  Serial.println("-- Default Test --"); //BME
  delayTime = 1000; //BME

  Serial.println();

  Serial.println("Connecting to wifi: ");
  Serial.println(ssid);
  Serial.flush();


  WiFi.begin(ssid, password);
  while (WiFi.status() != WL_CONNECTED) {
    delay(500);
    Serial.print(".");
  }
  Serial.println(" IP address: ");
  Serial.println(WiFi.localIP());


  Serial.print(String("Connecting to "));
  Serial.println(host);

  bool flag = false;
  for (int i = 0; i < 5; i++) {
    int retval = client.connect(host, httpsPort);
    if (retval == 1) {
      flag = true;
      break;
    }
    else
      Serial.println("Connection failed. Retrying...");
  }

  // Connection Status, 1 = Connected, 0 is not.
  Serial.println("Connection Status: " + String(client.connected()));
  Serial.flush();

  if (!flag) {
    Serial.print("Could not connect to server: ");
    Serial.println(host);
    Serial.println("Exiting...");
    Serial.flush();
    return;
  }

  // Data will still be pushed even certification don't match.
  if (client.verify(fingerprint, host)) {
    Serial.println("Certificate match.");
  } else {
    Serial.println("Certificate mis-match");
  }
}

// This is the main method where data gets pushed to the Google sheet
void postData(  String tag1, float value1,
                String tag2, float value2,
                String tag3, float value3)
                {
  if (!client.connected()) {
    Serial.println("Connecting to client again...");
    client.connect(host, httpsPort);
  }
  String urlFinal = url;
  urlFinal += String("&tag1=") + tag1 + "&value1=" + String(value1);
  urlFinal += String("&tag2=") + tag2 + "&value2=" + String(value2);
  urlFinal += String("&tag3=") + tag3 + "&value3=" + String(value3);
  client.printRedir(urlFinal, host, googleRedirHost);
}

// Continue pushing data at a given interval
void loop() {

  // Read analog value, in this case a soil moisture
  // You can send any value at any time.
  // Please don't send more that 10 values per second.
  // Read the Temp and Humidity from DHT

  Serial.print("Temperature = ");
  Serial.print(bme.readTemperature());
  Serial.println(" *C");

  Serial.print("Pressure = ");
  Serial.print(bme.readPressure() / 100.0F);
  Serial.println(" hPa");

  Serial.print("Approx. Altitude = ");
  Serial.print(bme.readAltitude(SEALEVELPRESSURE_HPA));
  Serial.println(" m");

  Serial.print("Humidity = ");
  Serial.print(bme.readHumidity());
  Serial.println(" %");

  // Post these data points in one URL
  postData( "Temperature", bme.readTemperature(),
            "Pressure", (bme.readPressure() / 100.0F),
            "Humidity", bme.readHumidity());
  // postData("Altitude", bme.readAltitude(SEALEVELPRESSURE_HPA));

 delay( 30 * 60L * 1000L );  // sleep 30 minute
}
Google Sheets Script
This is Allan's adjusted code that incorporates several items of data and presents them in a single row in Google Sheets.
// BY: Akshaya Niraula
// ON: 2016 November 12th.
// AT: http://www.embedded-lab.com/.....
// Adjustment for BME280 by Allan Schwartz


// 0) From Google spreadsheet, Tools > Script Editor...
// 1) Write your code
// 2) Save and give a meaningful name
// 3) Run and make sure "doGet" is selected
//    You can set a method from Run menu
// 4) When you run for the first time, it will ask
//    for the permission. You must allow it.
//    Make sure everything is working as it should.
// 5) From Publish menu > Deploy as Web App...
//    Select a new version every time it's published
//    Type comments next to the version
//    Execute as: "Me (your email address)"
//    MUST: Select "Anyone, even anonymous" on "Who has access to this script"
//    For the first time it will give you some prompt(s), accept it.
//    You will need the given information (url) later. This doesn't change, ever!

// Saving the published URL helps for later.
// https://script.google.com/macros/s/your_google_URL/exec
//

// This method will be called first or hits first
function doGet(e){
  Logger.log("--- doGet ---");

 var tag1 = "",
     value1 = "",
     tag2 = "",
     value2 = "",
     tag3 = "",
     value3 = "";

  try {

    // this helps during debuggin
    if (e == null){e={}; e.parameters = {tag:"test",value:"-1"};}

    tag1 = e.parameters.tag1;
    value1 = e.parameters.value1;
    tag2 = e.parameters.tag2;
    value2 = e.parameters.value2;
    tag3 = e.parameters.tag3;
    value3 = e.parameters.value3;

    // save the data to spreadsheet
    save_data(tag1, value1, tag2, value2, tag3, value3);


    return ContentService.createTextOutput("Wrote:\n  tag1: " + tag1 + "\n  value1: " + value1);

  } catch(error) {
    Logger.log(error);
    return ContentService.createTextOutput("oops...." + error.message
                                            + "\n" + new Date()
                                            + "\ntag1: " + tag1 +
                                            + "\nvalue1: " + value1);
  }
}

// Method to save given data to a sheet
function save_data(tag1, value1, tag2, value2, tag3, value3){
  Logger.log("--- save_data ---");

  try {
    var dateTime = new Date();

    // Paste the URL of the Google Sheets starting from https thru /edit
    // For e.g.: https://docs.google.com/..../edit
    var ss = SpreadsheetApp.openByUrl("https://docs.google.com/spreadsheets/d/your_google_URL/edit");
    var summarySheet = ss.getSheetByName("Summary");
    var dataLoggerSheet = ss.getSheetByName("DataLogger");

    // Get last edited row from DataLogger sheet
    var row = dataLoggerSheet.getLastRow() + 1;

    // Start Populating the data
    dataLoggerSheet.getRange("A" + row).setValue(row -1); // ID
    dataLoggerSheet.getRange("B" + row).setValue(dateTime); // dateTime
    dataLoggerSheet.getRange("C" + row).setValue(tag1); // tag
    dataLoggerSheet.getRange("D" + row).setValue(value1); // value
    dataLoggerSheet.getRange("E" + row).setValue(tag2); // tag
    dataLoggerSheet.getRange("F" + row).setValue(value2); // value
    dataLoggerSheet.getRange("G" + row).setValue(tag3); // tag
    dataLoggerSheet.getRange("H" + row).setValue(value3); // value

    // Update summary sheet
    summarySheet.getRange("B1").setValue(dateTime); // Last modified date
    // summarySheet.getRange("B2").setValue(row - 1); // Count
  }

  catch(error) {
    Logger.log(JSON.stringify(error));
  }

  Logger.log("--- save_data end---");
}
Circuit

Setting up for Outdoors
The problem with most sensors it they're not designed to use outdoors - a bit of moisture and they're frazzled for life.
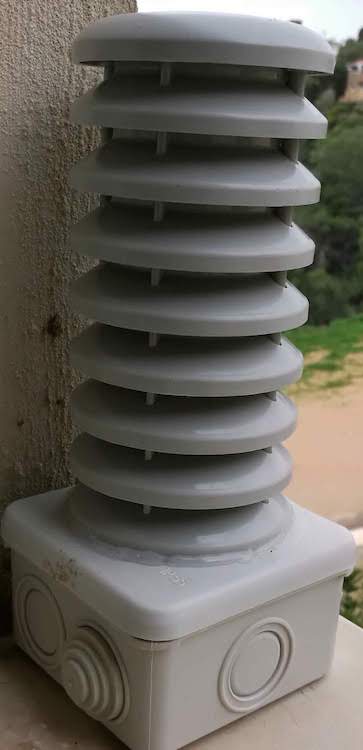
The way around this is by using a Stevenson Screen, a box with downward-sloping vents that allow air circulation without letting in the rain.

Fortunately, such Screens are available inexpensively on AliExpress.
All you need to do is mount the Screen on an outdoor electrical junction box that contains the electronics. The BME280 - on wires - reaches up through a hole into the center of the Stevenson Screen where it remains protected from the elements. A bit of hot glue around the seam, and you're set to go!
Raspberry Pi
My co-blogger, Allan Schwartz will shortly post a similar project using the Raspberry Pi.